1. How to Increase Max Input Vars (3000) for Your Website
2. Installing the theme
3. How to Refresh / Flush WordPress Permalinks
4. How to Increase Post Max Size for Your Website
5. How to Increase the Max Input Vars Limit & WP memory Limit
6. Common Installation Error: "The package could not be installed. The theme is missing the style.css stylesheet." – How to Fix It
7. Configuring the menu
8. Installing WordPress
9. How to Increase Max Execution Time (300s) for Your Website
10. How to Use Mega menu?
11. Configuring the front page and the blog page
12. Importing demo content
13. How to Increase the Maximum File Upload Size for Your Website
1. How to Increase Max Input Vars (3000) for Your Website
The Max Input Vars setting in PHP determines the maximum number of input variables your server can handle in a single request. If you're working with large forms, complex menus, or bulk settings updates, you may encounter issues like "Max Input Vars Limit Exceeded." To resolve this, you can increase the limit. Here's how to do it.
What Are Max Input Vars?
The max_input_vars directive in PHP limits the number of input variables sent via GET, POST, or COOKIE. If the number of variables exceeds this limit, some data may be truncated, leading to incomplete submissions.
Step 1: Check the Current Max Input Vars Value
Before making changes, determine the current max_input_vars value. Here's how:
A) Using PHP Info
Create a file named phpinfo.php with the following code:
<?php
phpinfo();
?>
Upload the file to your website’s root directory.
Open the file in your browser (e.g., http://yourwebsite.com/phpinfo.php).
Look for max_input_vars in the output.
B) Using Your Website Admin Panel
Log in to your website's admin panel.
Navigate to System Info or Server Settings.
Locate the max_input_vars value.
Step 2: Increase Max Input Vars
The method to increase the max_input_vars value depends on your hosting environment.
A) Edit php.ini
Access your server using FTP or your hosting control panel.
Locate the php.ini file (usually in the root directory or /etc/).
Open the file and add or update the following line:
max_input_vars = 3000
Replace 3000 with the desired limit, e.g., 5000.
Save the file and restart your server.
B) Modify .htaccess (For Apache Servers)
Open the .htaccess file in your website’s root directory.
Add the following line:
php_value max_input_vars 3000
Save the file. Changes will take effect immediately.
C) Update Using cPanel or Hosting Dashboard
Log in to your hosting provider’s control panel.
Navigate to PHP Settings or MultiPHP INI Editor.
Locate the max_input_vars option.
Increase the value to 3000 or higher (e.g., 5000).
Save the changes.
D) Use a .user.ini File (For Shared Hosting)
If you’re on shared hosting, create or edit a .user.ini file in your website's root directory.
Add the following line:
max_input_vars = 3000
Save the file. Changes may take a few minutes to apply.
E) Contact Your Hosting Provider
If you're unable to modify these settings, contact your hosting provider and request an increase in max_input_vars.
Step 3: Verify the New Max Input Vars Value
After making the changes:
Refresh your website or clear the server cache.
Revisit the phpinfo.php file to confirm the updated value.
Test the functionality that was previously failing to ensure the issue is resolved.
Troubleshooting Common Issues
Changes Not Taking Effect: Ensure the correct configuration file (php.ini, .htaccess, or .user.ini) is edited. Restart the server if necessary.
Shared Hosting Limits: Some hosting providers impose strict limits. Contact them if your changes don’t work.
Syntax Errors: Check for typos or formatting errors in your configuration files.
Best Practices
Avoid setting max_input_vars too high to prevent server performance issues.
Monitor server logs to ensure that increasing the limit doesn’t lead to abuse or resource overuse.
If you're unsure about the right value, start with incremental increases and test thoroughly.
Conclusion
Increasing Max Input Vars is crucial for websites with large forms, extensive menus, or complex configurations. By following these steps, you can ensure smooth functionality and avoid truncation issues. If you face challenges, don’t hesitate to reach out to your hosting provider for support.
2. Installing the theme
After installing WordPress, the next step is to install the Mayosis theme. There are two ways to do this:
using FTP and using WordPress.
Using WordPress
1. Log in as admin;
2. Navigate to Appearance > Themes > Install themes;
3. Upload the .ZIP file named mayosis.zip.
If you want to install the child theme too repeat the steps above, but upload the child theme .ZIP file.
Using FTP
1. Extract the .ZIP. This will leave you with a folder named ‘mayosis’;
2. Using your FTP client of choice navigate to /wp-content/themes and upload the folder there.
If you want to install the child theme too repeat the steps above, but upload the child theme folder.
Activating
No matter which method you choose, the theme needs to be activated after install. To activate the
Mayosis theme navigate to Appearance à Themes and choose the blue ‘Activate’ button which
appears under the Mayosis> license.
3. How to Refresh / Flush WordPress Permalinks
Whenever a new custom post is added through a plugin or code, WordPress permalinks usually need to be flushed. Also, that's required after transferring the site to another domain.
Step 1: In the WordPress admin area, go to “Settings > Permalinks”
Step 2: Click “Save Changes”
Step 3: Permalinks and rewrite rules are flushed.
4. How to Increase Post Max Size for Your Website
The Post Max Size setting determines the maximum size of POST data your website can handle. This includes form submissions, file uploads, and data sent during HTTP POST requests. If you're encountering issues like "POST content length exceeds the limit" or incomplete file uploads, you may need to increase this limit. Here's how you can do it.
What Is Post Max Size?
The post_max_size directive in PHP sets the maximum amount of data that can be sent in a single POST request. This value should always be equal to or larger than the upload_max_filesize to avoid upload issues.
Step 1: Check the Current Post Max Size
Before increasing the limit, determine the current post_max_size setting. You can check it using one of these methods:
A) Using PHP Info
Create a file named phpinfo.php with the following code:
<?php
phpinfo();
?>
Upload this file to your website's root directory.
Open the file in your browser (e.g., http://yourwebsite.com/phpinfo.php).
Look for post_max_size in the output.
B) Using Your Website Admin Panel
Log in to your website’s admin panel.
Navigate to System Info or Settings > Upload Settings.
Look for the post_max_size value.
Step 2: Increase Post Max Size
Here are the methods to increase the post_max_size value, depending on your hosting environment.
A) Edit php.ini
Access your server via FTP or your hosting control panel.
Locate the php.ini file (commonly found in the root directory or /etc/).
Open the file and add or modify the following line:
post_max_size = 64M
Save the file and restart your server.
B) Modify .htaccess (For Apache Servers)
Open the .htaccess file located in your website’s root directory.
Add the following line:
php_value post_max_size 64M
Save the file. The changes will take effect immediately.
C) Update Using cPanel or Hosting Dashboard
Log in to your hosting provider’s control panel.
Navigate to PHP Settings or MultiPHP INI Editor.
Locate the post_max_size setting.
Increase the value to 64M or higher.
Save the changes.
D) Add to .user.ini (For Shared Hosting)
If you’re on shared hosting, create or edit a .user.ini file in your website's root directory.
Add the following line:
post_max_size = 64M
Save the file. Changes may take a few minutes to apply.
Step 3: Adjust Related Settings
To ensure smooth uploads and data processing, adjust these related settings in php.ini or .htaccess:
upload_max_filesize: Match or set slightly lower than post_max_size.
upload_max_filesize = 64M
max_execution_time: Increase this to handle larger files or requests.
max_execution_time = 300
Step 4: Verify the New Post Max Size
After making the changes:
Refresh your website or clear the cache.
Upload a file or submit a form to test if the new limit works.
Recheck phpinfo.php or your admin panel to confirm the updated post_max_size value.
Troubleshooting Common Issues
Changes Not Applied: Ensure the correct configuration file (php.ini or .htaccess) is edited. Restart the server if required.
Shared Hosting Limits: Some hosting providers enforce strict limits. Contact your provider for assistance.
Configuration File Errors: Ensure there are no syntax errors in .htaccess or php.ini.
Best Practices
Set the post_max_size slightly higher than upload_max_filesize to account for metadata and additional data sent with files.
Avoid excessively high values to prevent server strain or misuse.
Monitor server logs to identify any upload or form submission issues.
Conclusion
Increasing the post max size is essential for websites handling larger uploads or form submissions. By following these steps, you can resolve upload errors and ensure your website operates smoothly. If you encounter issues, your hosting provider's support team is an excellent resource to guide you through the process.
5. How to Increase the Max Input Vars Limit & WP memory Limit
Increase Max Input Vars
The max_input_vars directive can be set in .htaccess, php.ini , .user.ini or wp-config.php file.
Directive for .htaccess
php_value max_input_vars 4000
Directive for php.ini or .user.ini
<strong>max_input_vars =4000
</strong>
Directive for wp-config.php
@ini_set( 'max_input_vars' , 4000 );<span></span>
Increase WP Memory Limit
Directive for wp-config.php
define( 'WP_MEMORY_LIMIT', '512M' );
If this code already exists in your wp-config.php file, you need to increase the number. For example, you can increase it from 32M to 512M.
If you don’t see this line of code in the file, you’ll need to add it. Just add the following code above the line that says
/* That's all, stop editing! Happy publishing. */:
6. Common Installation Error: "The package could not be installed. The theme is missing the style.css stylesheet." – How to Fix It
Common Installation Error: "The package could not be installed. The theme is missing the style.css stylesheet."
When installing or updating a WordPress theme, some users may encounter an error stating:
"The package could not be installed. The theme is missing the style.css stylesheet."
This issue typically arises when attempting to upload the entire downloaded theme package instead of the installable theme file. Below, we will guide you through the correct steps to install or update your theme safely and correctly.
Why Does This Error Occur?
When you purchase or download a premium WordPress theme, you often receive a compressed ZIP package that contains additional files such as:
Documentation
Licensing details
Demo content
Plugins
The actual theme file
Since WordPress only recognizes the installable theme file, uploading the full package will result in the missing stylesheet error.
Correct Steps to Install Your WordPress Theme
Step 1: Extract the Downloaded Theme Package
After downloading your theme from the marketplace or theme provider, follow these steps:
Locate the downloaded ZIP file on your computer (e.g., themename_package.zip).
Right-click on the file and choose Extract or Unzip (depending on your operating system).
After extracting the downloaded package, you will find a folder named Upload inside it. This folder contains the installable theme file in ZIP format, such as themename.zip, which should be uploaded to WordPress. (this is the actual installable theme file).
Step 2: Install the Theme in WordPress
Log into your WordPress dashboard.
Navigate to Appearance → Themes → Add New → Upload Theme.
Click Choose File and select the themename.zip file.
Click Install Now.
Once the installation is complete, click Activate.
Step 3: Install Required Plugins
Many premium themes require additional plugins for full functionality. After installing the theme, go to Appearance → Install Plugins and activate all recommended plugins.
Correct Steps to Update Your WordPress Theme
Backup Your Website (Highly Recommended)
Before making any updates, always create a backup of your WordPress site to avoid losing any important customizations. You can use a plugin like UpdraftPlus or All-in-One WP Migration to create a full backup of your site.
Step 1: Upload the New Theme Version
Once you have extracted the correct installable theme file, follow these steps:
Log into your WordPress dashboard.
Navigate to Appearance → Themes → Add New → Upload Theme.
Click Choose File and select the themename.zip file.
Click Install Now.
WordPress will prompt you to confirm replacing the existing theme. Click Replace Current with Uploaded.
Once the installation is complete, click Activate.
Step 2: Update Required Plugins
After updating the theme, ensure that all necessary plugins (e.g., core plugins, page builders, or custom functionalities) are updated:
Go to Plugins → Installed Plugins.
Look for any required updates and click Update Now.
Alternative Method: Updating via FTP (For Advanced Users)
If you are unable to upload the theme through the WordPress dashboard, you can manually update the theme using an FTP client like FileZilla.
Connect to your website using an FTP client.
Navigate to /wp-content/themes/.
Locate the existing theme folder (themename) and rename it to themename_old as a backup.
Upload the new themename folder extracted from the ZIP file.
Once uploaded, go to your WordPress dashboard and activate the new theme version.
Important Notes to Prevent Data Loss
If you have made custom changes to the theme files (e.g., editing PHP, CSS, or JavaScript files directly), they may be overwritten. To prevent this, consider using a child theme for modifications.
Always clear your cache after updating the theme to ensure that all changes are applied correctly.
If your website relies on specific theme settings, check if the update resets any configurations and reapply them if necessary.
Conclusion
Properly installing and updating your WordPress theme ensures that your site remains secure and functions optimally. The most common mistake users make is uploading the entire theme package instead of the installable theme file. By following this guide, you can install or update your theme smoothly without encountering errors or losing customizations.
7. Configuring the menu
If you want to create a menu or change the menu imported by the demo, you can do so. To do this,
follow the next steps:
1. Log in as admin
2. In the left panel go to Appearance > Menus
3. Here you can change the menus, and also change the menu locations.
More information about using WordPress Menus can be read in the Codex, here:
Installing_WordPress) to see how you can install WordPress on your webserver.
9. How to Increase Max Execution Time (300s) for Your Website
The Max Execution Time setting in PHP determines the maximum time a script is allowed to run before being terminated. If your website handles long-running tasks, such as large file uploads, data imports, or plugin/theme updates, you might encounter errors like "Maximum execution time exceeded." Increasing the Max Execution Time can resolve these issues.
What Is Max Execution Time?
The max_execution_time directive in PHP defines the time limit (in seconds) for script execution. By default, this is set to 30 seconds, but many hosting environments set it to 300 seconds. If a script runs longer than this time, it will terminate to prevent server overload.
Step 1: Check the Current Max Execution Time
Before making changes, determine the current max_execution_time value:
A) Using PHP Info
Create a file named phpinfo.php with the following code:
<?php
phpinfo();
?>
Upload the file to your website's root directory.
Open the file in your browser (e.g., http://yourwebsite.com/phpinfo.php).
Look for max_execution_time in the output.
B) Using Your Website Admin Panel
Log in to your website's admin panel.
Navigate to System Info or Server Settings.
Look for the max_execution_time value.
Step 2: Increase Max Execution Time
Here are several methods to increase the max_execution_time value, depending on your hosting environment:
A) Edit php.ini
Access your server via FTP or your hosting control panel.
Locate the php.ini file (commonly in the root directory or /etc/).
Open the file and add or update the following line:
max_execution_time = 300
Replace 300 with the desired value, such as 600 for 10 minutes.
Save the file and restart your server.
B) Modify .htaccess (For Apache Servers)
Open the .htaccess file located in your website’s root directory.
Add the following line:
php_value max_execution_time 300
Replace 300 with your desired value.
Save the file. The changes will take effect immediately.
C) Update Using cPanel or Hosting Dashboard
Log in to your hosting provider’s control panel.
Navigate to PHP Settings or MultiPHP INI Editor.
Find the max_execution_time option.
Increase the value to 300 or higher (e.g., 600).
Save the changes.
D) Use a .user.ini File (For Shared Hosting)
If you’re on shared hosting, create or edit a .user.ini file in your website’s root directory.
Add the following line:
max_execution_time = 300
Save the file. Changes may take a few minutes to apply.
E) Set Using WordPress wp-config.php (Temporary Solution)
Open the wp-config.php file in your WordPress installation directory.
Add the following line before /* That's all, stop editing! Happy publishing. */:
@ini_set('max_execution_time', 300);
This method overrides the server setting but is temporary and may not work on some hosts.
F) Contact Your Hosting Provider
If you’re unable to modify the settings yourself, contact your hosting provider and request an increase in max_execution_time.
Step 3: Verify the New Max Execution Time
Refresh your website or clear the server cache.
Revisit the phpinfo.php file or your admin panel to confirm the updated value.
Test the functionality that was previously timing out.
Troubleshooting Common Issues
Changes Not Applied: Ensure you edited the correct configuration file and restarted the server if required.
Shared Hosting Restrictions: Some hosting providers enforce strict limits. Contact them for assistance.
Syntax Errors: Ensure there are no typos in the .htaccess or php.ini files.
Best Practices
Avoid setting excessively high values to prevent server strain.
Monitor your server performance and logs to ensure stability after increasing the limit.
Use optimized scripts and processes to reduce execution time wherever possible.
Conclusion
Increasing the Max Execution Time is essential for handling long-running scripts on your website. By following the steps outlined above, you can prevent timeout errors and ensure smooth operations. If you encounter difficulties, your hosting provider can assist in adjusting the settings for you.
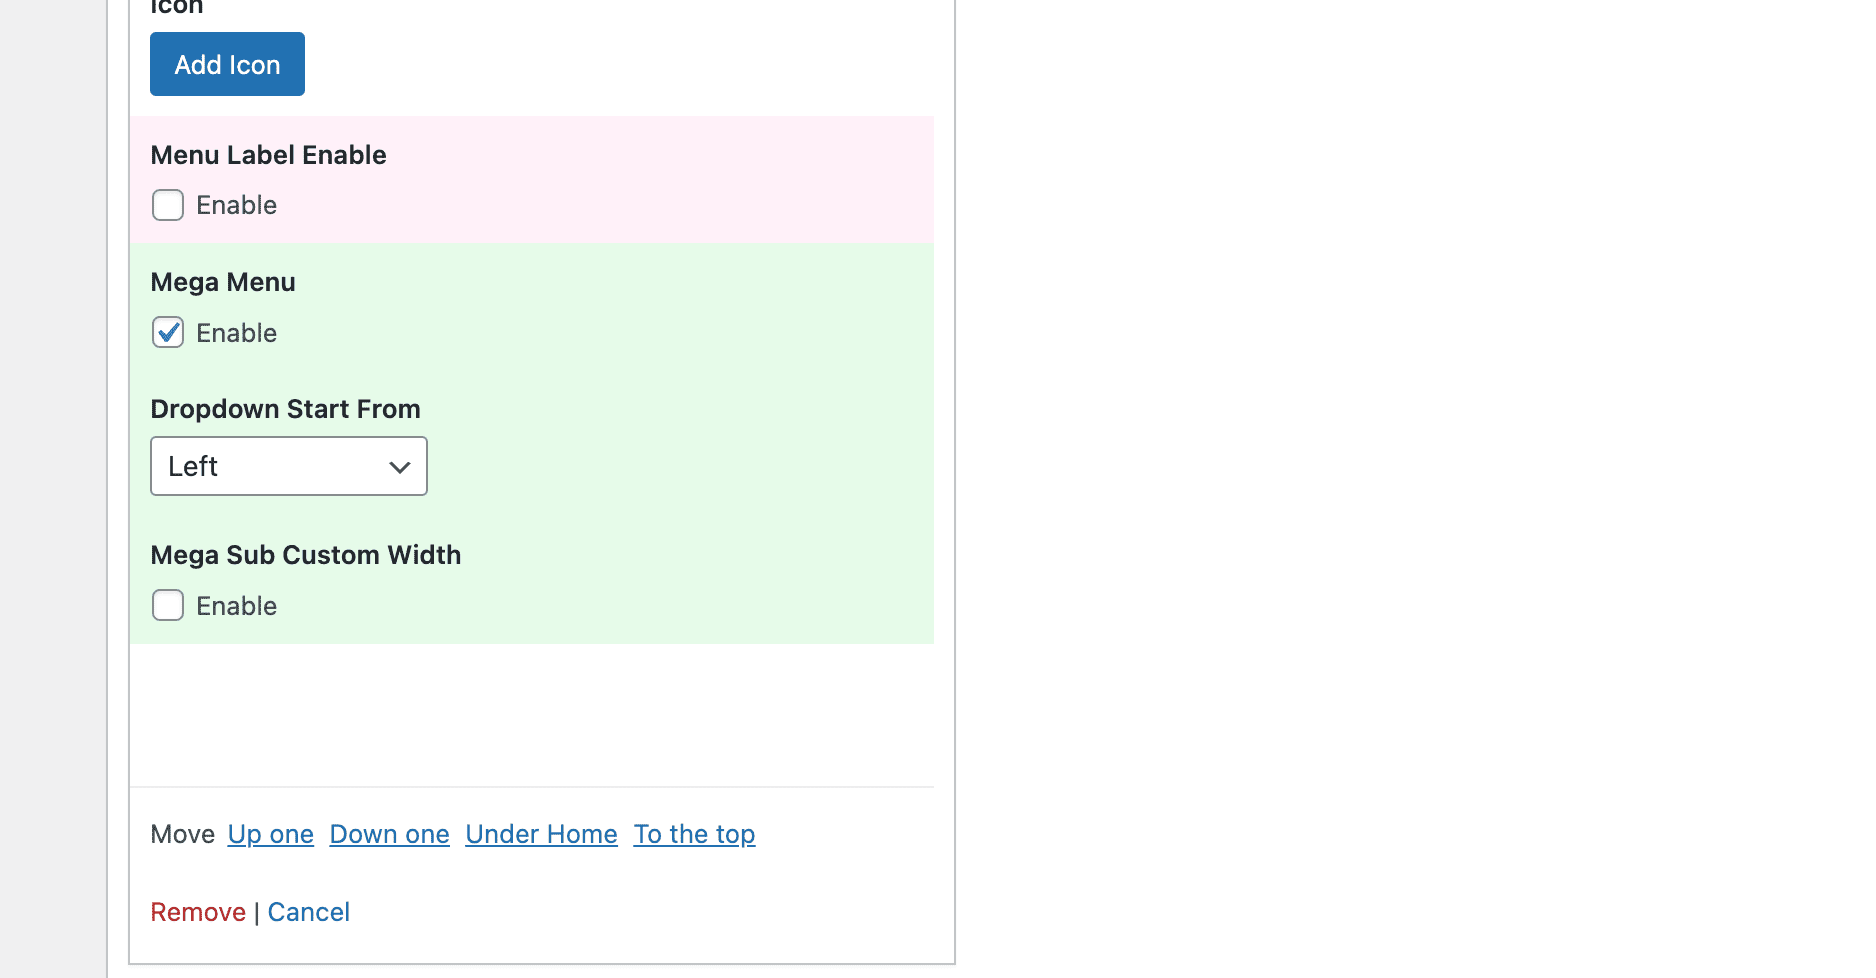
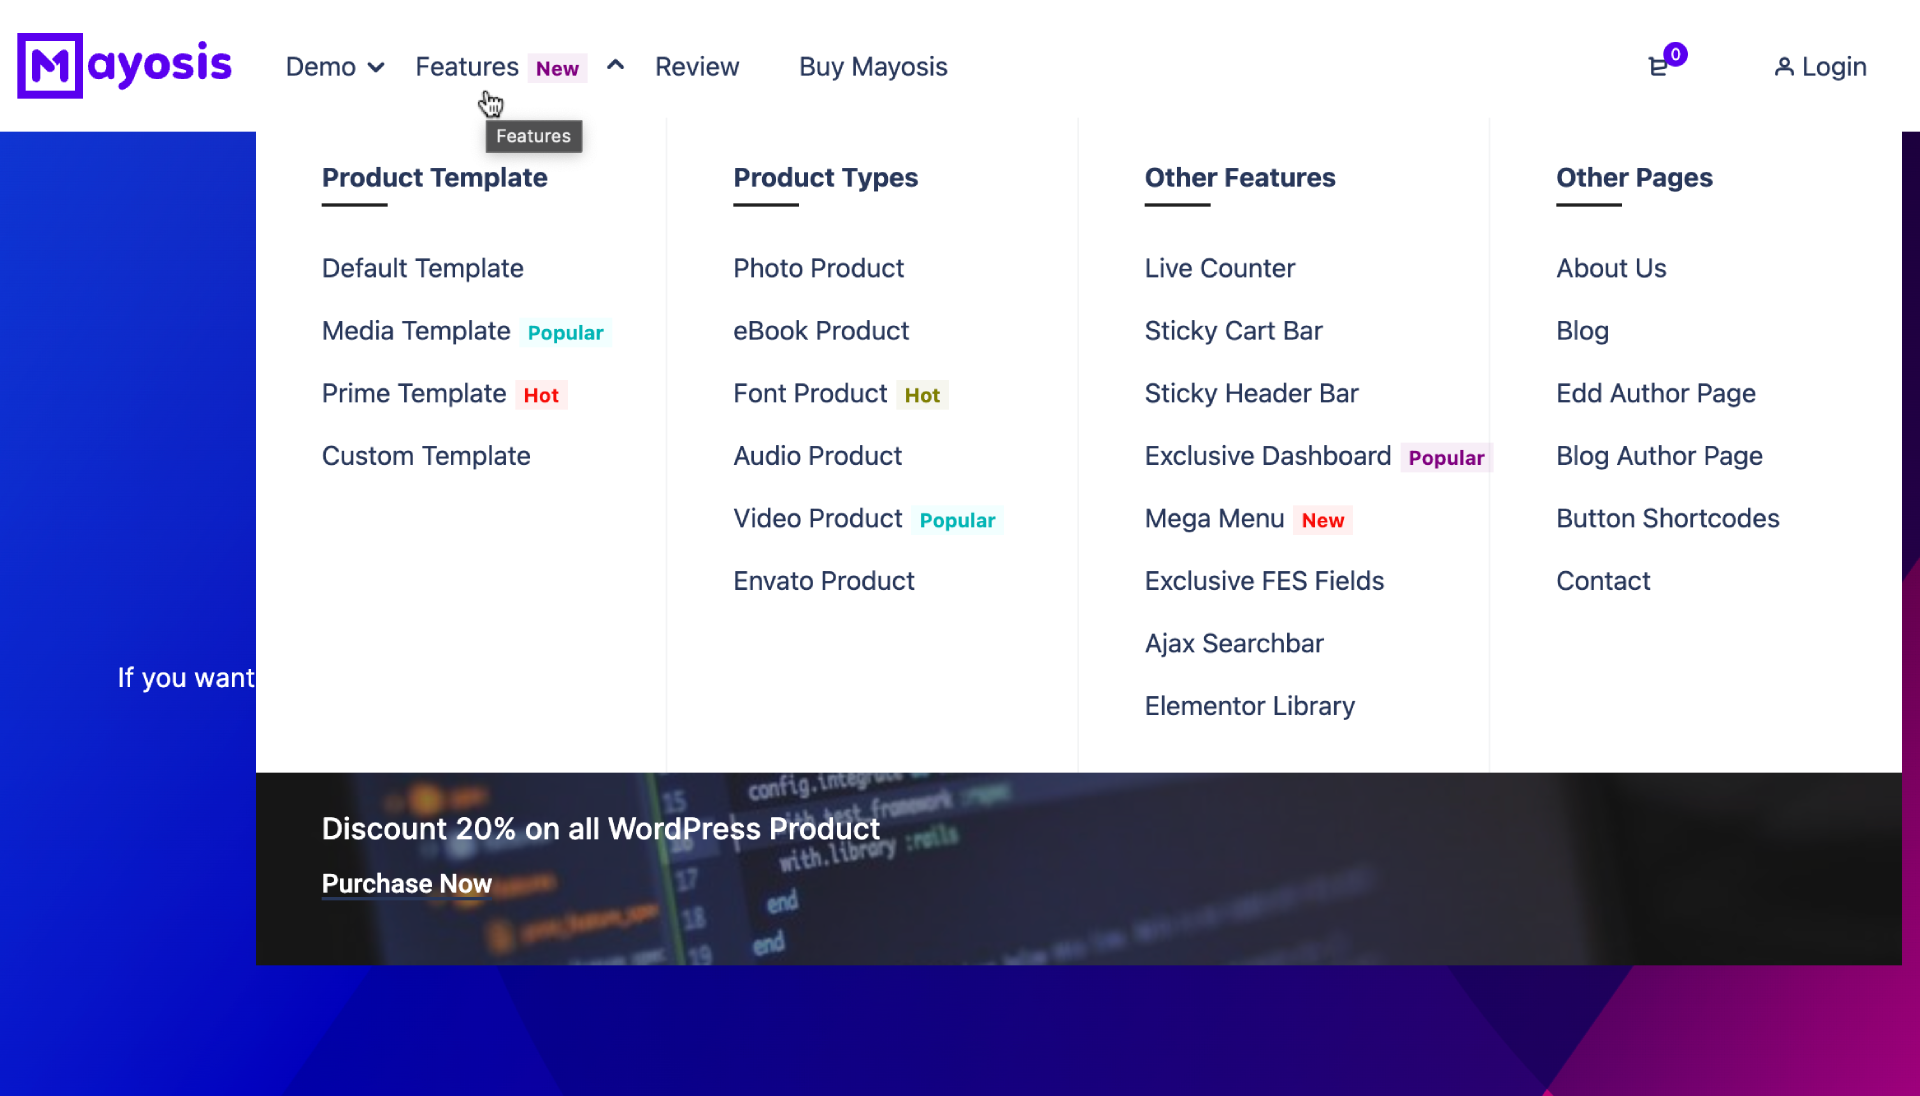
10. How to Use Mega menu?
1. At first, enable the Mega menu from the Customizer option panel. There you will find mega menu color options. Typography options are included in typography.
2. Now go to the menu from Appearance & After that open the menu item (in the first level) which you want to have a dropdown Megamenu, and check the box “Megamenu”
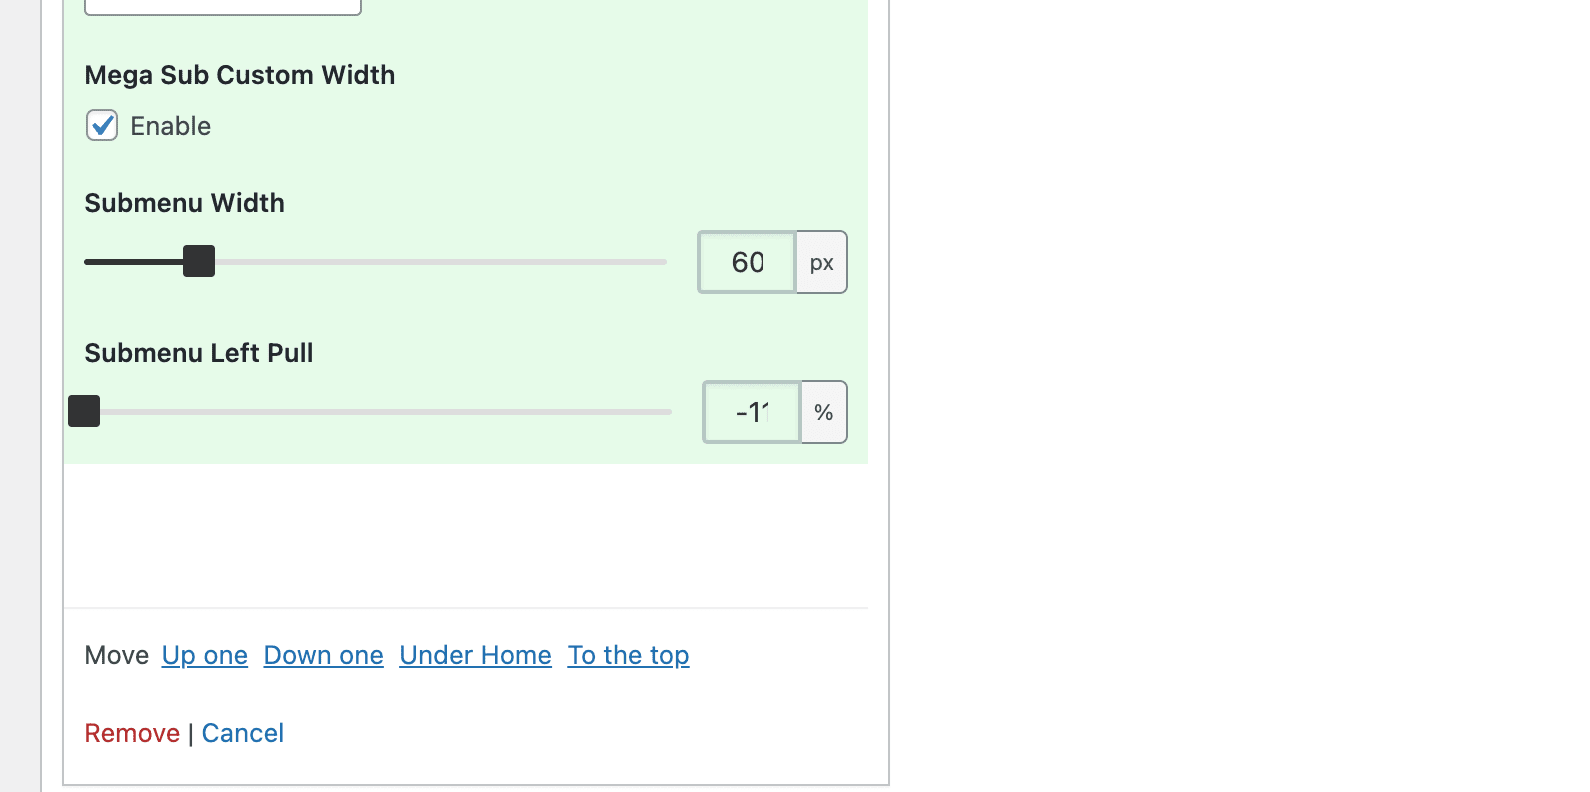
Megamenu size
You will be able to set the custom width of mega menu. Set width & pull left by the negative or positive value.
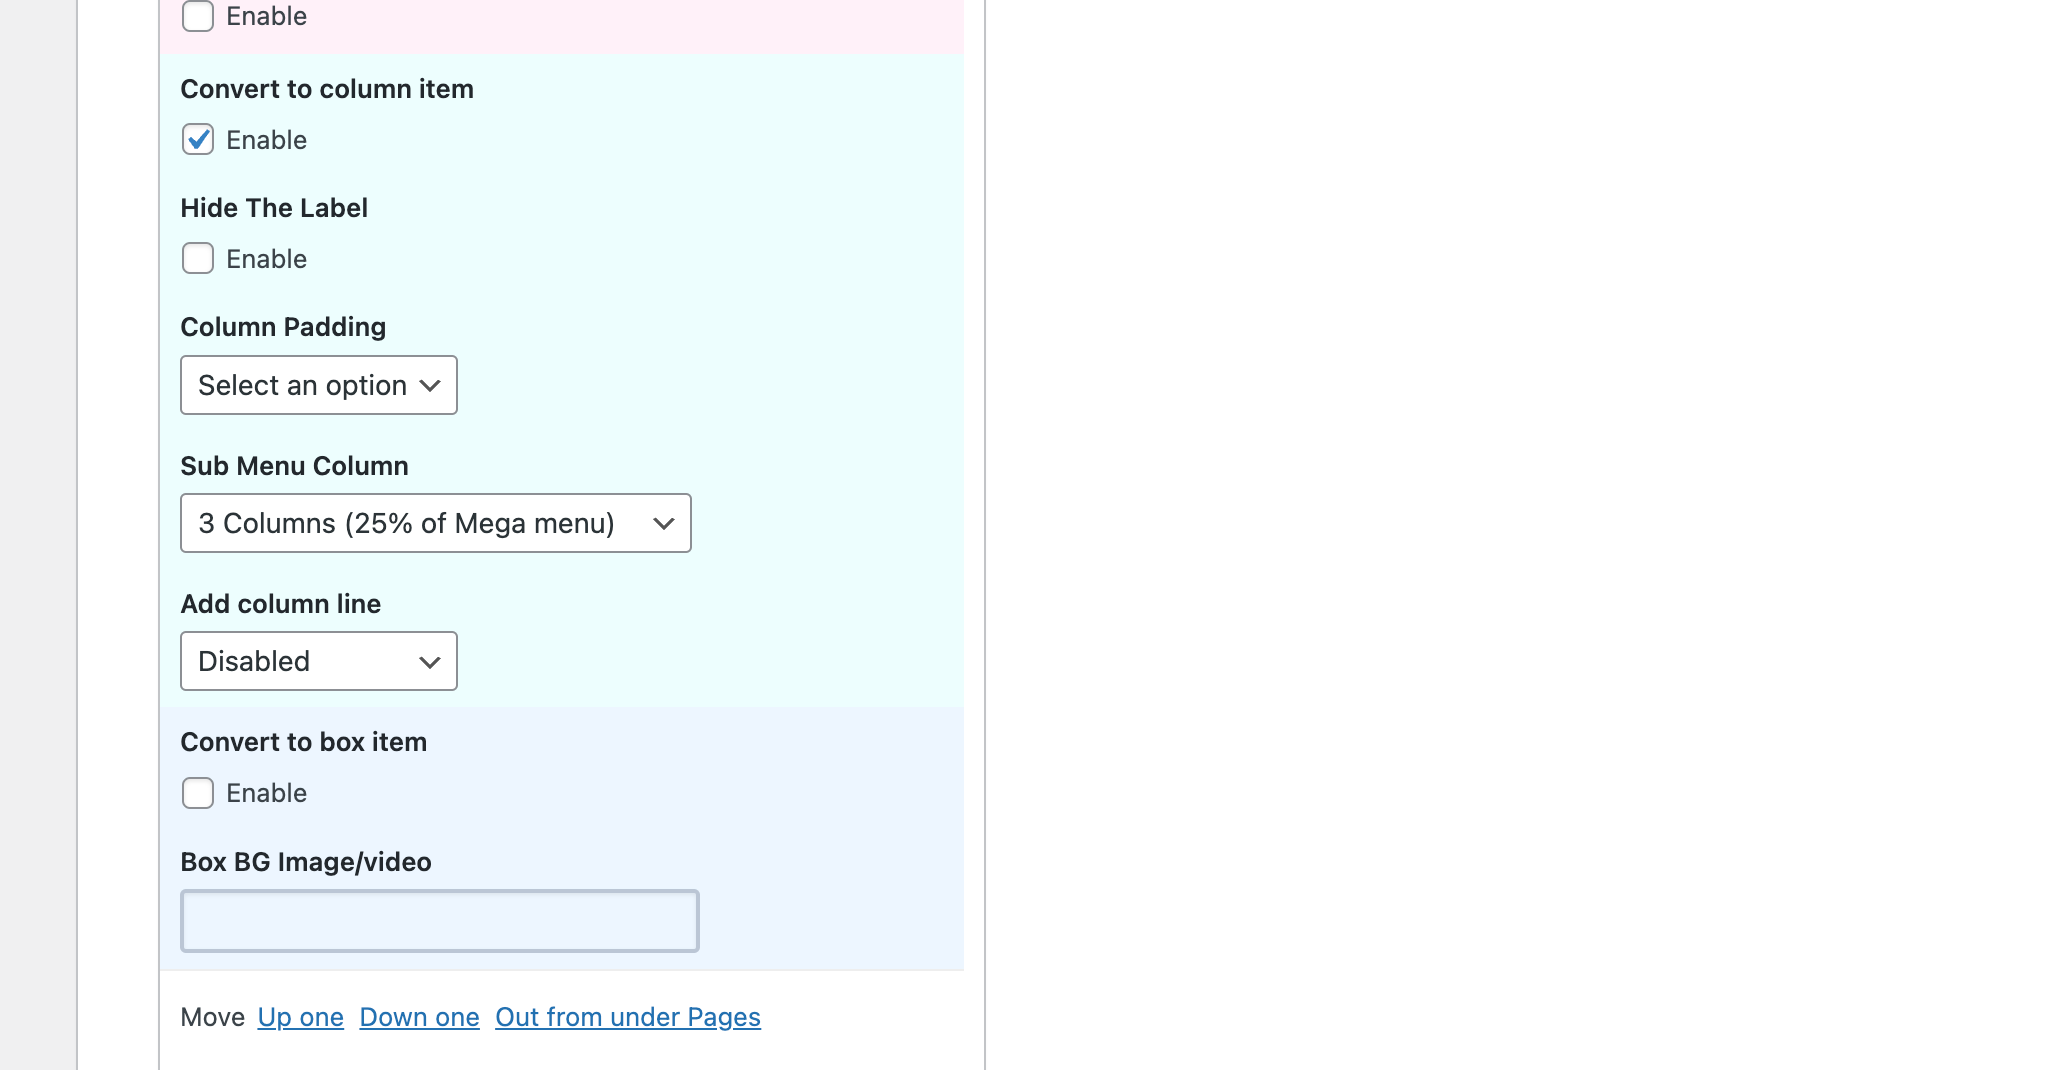
Adding columns to your Mega Menu:
To add columns to your mega menu, add a custom link from the left area with a link as “#” and the link as the desired title of the column inside the Megamenu (for example: About us), and add this custom link under the main mega menu main item (as second-level item), and check the box “Convert to column item”, you can also choose the desired column width of this column, or you can change the style of the column by adding padding or lines.
You can now add any number of columns the same way inside the mega menu, and the columns can be in any different sizes depending on the style that you want to build.
You can set a title for the whole column via the “Hide the Label field of that column item in your menu
Adding menu banners or Elementor Content
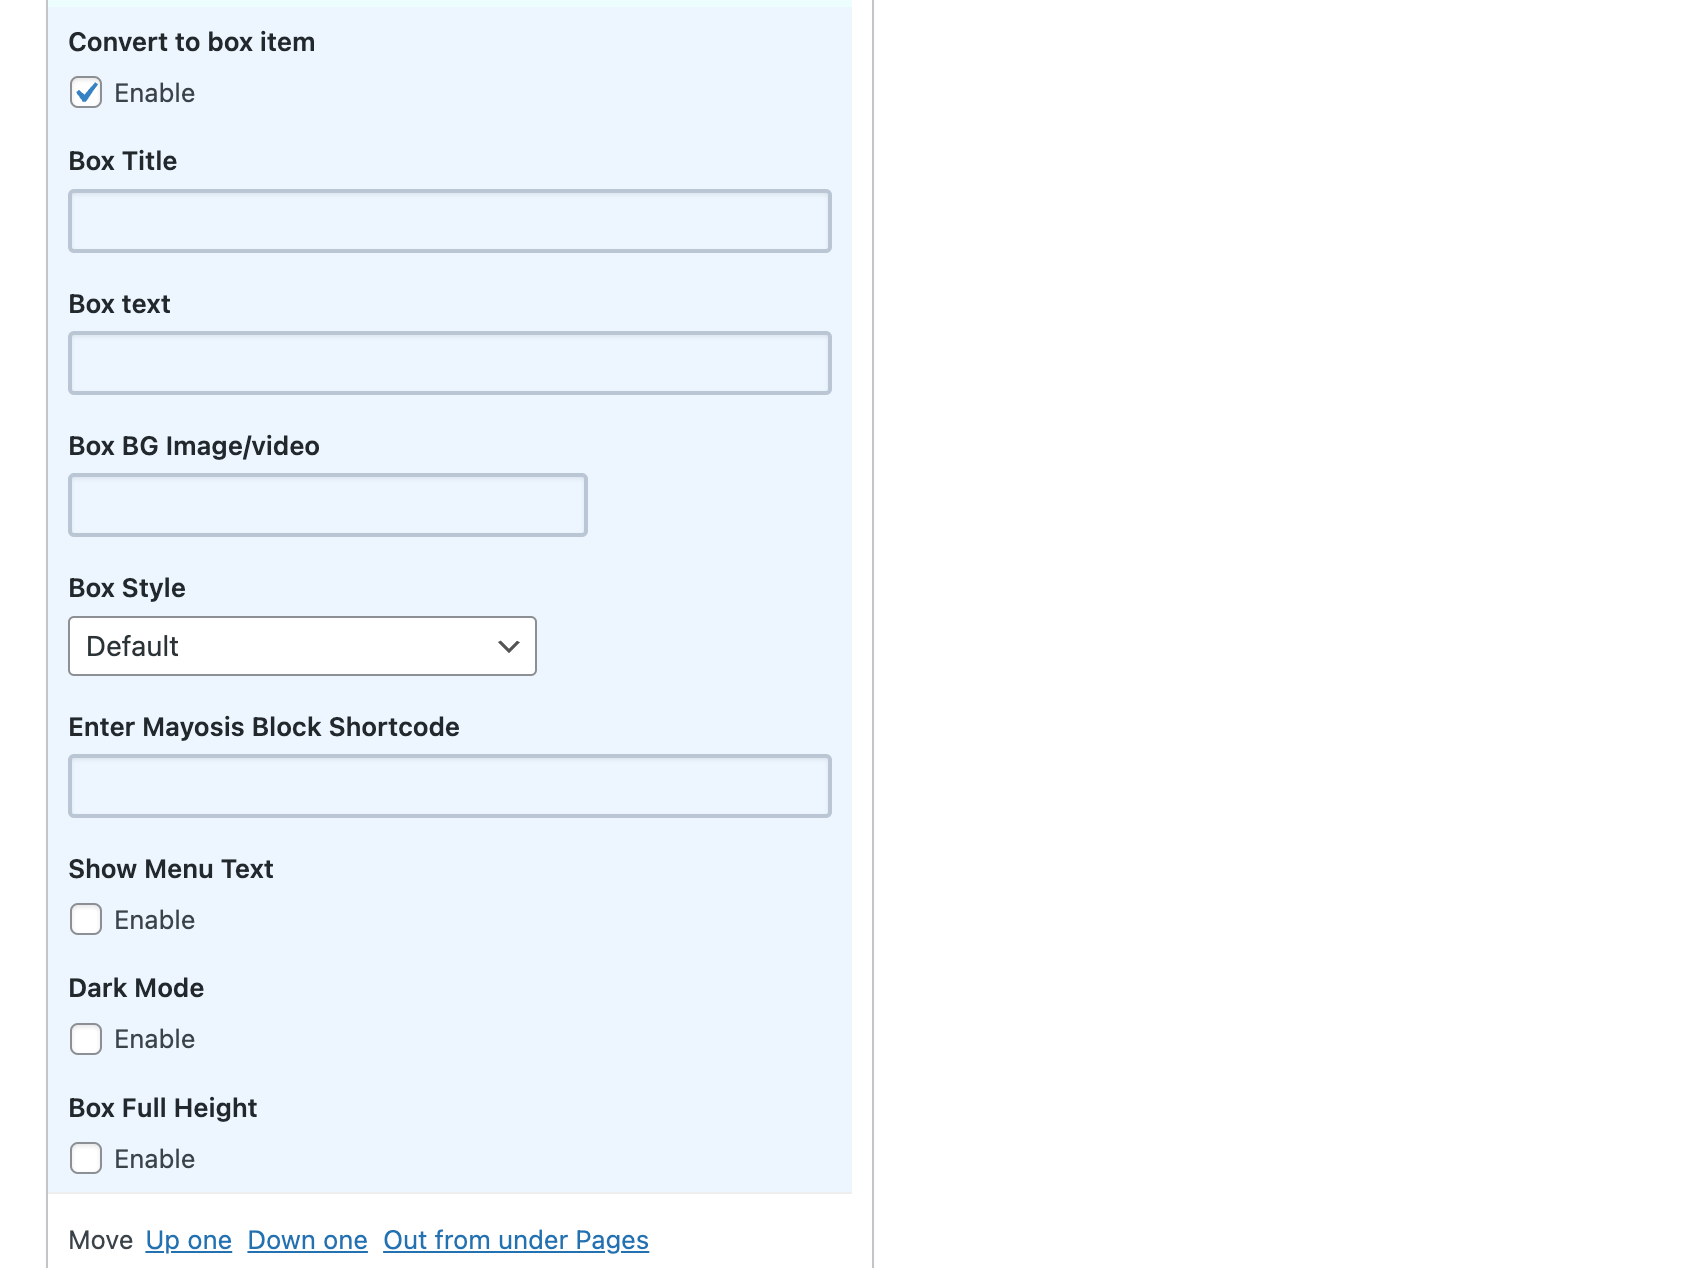
In addition to normal links, you can add advanced items to the mega menu like the image or video banners, to do so add any menu item inside the mega menu then open its options, then check the box “Convert to Box item” and choose the desired Title and text, and choose an image/video, you can also change box style or its height or the color of the text inside the box. Also, add Mayosis Block Shortcode To show Elementor custom content. That's much easy to show your Elementor column or anything by elementor by shortcode.
This is much easier to handle. If need more help please create a ticket.
11. Configuring the front page and the blog page
You may need to set your front page and/or blog page yourself, or you may want to change these
pages.
To do this, follow the next steps:
1. Log in as admin
2. In the left panel go to Settings > Reading
3. Choose the pages for both the front page and the blog page.
You have now set a front page and blog page.
12. Importing demo content
Please note that you can only import demo content after installing all the required plugins first. If you
have not done this yet, please do this now before continuing this step. If you would like to use Easy
Digital Downloads – Frontend Submissions for a multivendor marketplace please install and activate
this plugin first, too.
Importing demo content gives you a head start in which you mostly need to customize as you wish.
To import demo content, follow the next steps:
1. Log in as admin;
2. In the left panel go to Mayosis > Import demo content;
3. Choose the demo you would like to import. Because we like to give our user maximum freedom
in their preferences, we have made multiple demos with the page builders ‘Elementor’ and
‘WPBakery’. This means that you can import the demo with the page builder of your
preference;
4. After clicking ‘import’ please wait for a few minutes till all the demo content is imported.
You are all set; all the demo content is now imported and you should have the same website as the demo
13. How to Increase the Maximum File Upload Size for Your Website
Managing file uploads is essential for any website that allows users to upload files, whether it’s for images, videos, or documents. Sometimes, the default maximum file upload size set by your server or CMS may not meet your needs. In this article, we’ll walk you through the steps to increase the maximum file upload size for your website.
Why Increase the File Upload Size?
Here are a few reasons why you might need to increase the file upload size:
Uploading larger media files such as high-resolution images or videos.
Allowing users to upload detailed documents or reports.
Enabling large backup or import files for your site.
Step 1: Check the Current File Upload Limit
Before making changes, you need to know the current file upload limit. Follow these steps:
Log in to your website's admin panel (e.g., WordPress, Teconce Support System, etc.).
Navigate to the System Settings or Media Settings section.
Look for an option like Max File Upload Size. Note the current limit.
Alternatively, you can create a PHP file with the following content to check the limit:
<?php
phpinfo();
?>
Upload this file to your server and open it in your browser to see the current upload_max_filesize and post_max_size values.
Step 2: Increase the Upload Size Limit
There are several methods to increase the maximum file upload size, depending on your hosting setup. Choose the one that applies to your environment.
A) Update php.ini File
The php.ini file controls many server configurations, including file upload limits.
Access your server using an FTP client or your hosting control panel.
Locate the php.ini file (it’s usually in the root folder or /etc/ directory).
Save the file. No need to restart the server as changes take effect immediately.
C) Update via cPanel or Hosting Dashboard
Log in to your hosting provider’s control panel.
Navigate to PHP Settings or MultiPHP INI Editor.
Locate the upload_max_filesize and post_max_size settings.
Increase the values (e.g., 64M).
Save changes and restart your server if required.
D) Use a Plugin (For WordPress)
If you’re using WordPress, plugins like Increase Maximum Upload File Size or WP Maximum Upload File Size make this process simple:
Install and activate the plugin.
Go to the plugin settings.
Set the desired maximum upload size.
Save changes.
Step 3: Update Application Settings
After increasing the server-level limits, make sure to update the settings within your website’s admin panel to reflect the new limit:
Log in to your website admin panel.
Navigate to the Settings or Upload Options section.
Update the Max File Upload Size field with the new value.
Step 4: Verify the Changes
To confirm the changes:
Attempt to upload a file close to the new size limit.
Check if the upload is successful without errors.
If it fails, double-check your changes and contact your hosting provider if needed.
Troubleshooting Common Issues
Changes Not Taking Effect: Ensure you restarted your server after modifying configuration files.
Permission Errors: Make sure you have the necessary permissions to edit the configuration files.
Shared Hosting Restrictions: Some shared hosting providers may enforce strict limits. Contact your hosting provider for assistance.
Conclusion
Increasing the maximum file upload size is a straightforward process when you know the right settings to adjust. Whether you’re running a website on WordPress, a custom CMS, or any platform, these steps will help you accommodate larger file uploads and improve user experience. If you encounter difficulties, your hosting provider’s support team is an excellent resource for assistance.