5. Add Custom Menu To EDD Frontend Submission Dashboard
6. How to use list style product?
7. Page Builders Support for the Mayosis Theme
8. Header flex layouts
9. Header Builder
10. Header rows and columns configuration
11. Create Video Product
12. How to create a new product template?
13. How to enable vendor profile cover photo upload option?
14. How to add audio playlist on FES Submission form
15. Installing WordPress
16. How to Increase the Max Input Vars Limit & WP memory Limit
17. Sell Envato Product
18. How to add the featured vendor on any page
19. Use a Child Theme
20. Download Template
21. How to set fixed Image size for the regular grid?
22. Configuring the menu
23. Adding Currency Support
24. How to Use Mega menu?
25. Setup Fontier Plugin with Mayosis
26. Global header settings
27. Header Mobile & Tablet settings
28. iOs Video Preload Issue
29. Configuring the front page and the blog page
30. Header Builder
31. Fix the social share plugin issue
32. Other cool EDD extensions
33. Create Audio Product
34. How to add vendor widget in single product page
35. Easy Digital Downloads – Frontend Submissions (FES) configuration
36. How to change dashboard logo?
37. Theme options
38. Email Template
39. Installing the theme
40. How to enable EDD Category on the menu?
1. White Label
The Mayosis theme comes with a own look and feel to the WordPress (admin) login screen. In the ‘White label’ section, we can change this look and feel. How many themes have you seen that offer a custom login screen AND options to customize this? We got you covered here.
2. How to Refresh / Flush WordPress Permalinks
Whenever a new custom post is added through a plugin or code, WordPress permalinks usually need to be flushed. Also, that's required after transferring the site to another domain.
Step 1: In the WordPress admin area, go to “Settings > Permalinks”
Step 2: Click “Save Changes”
Step 3: Permalinks and rewrite rules are flushed.
3. Importing demo content
Please note that you can only import demo content after installing all the required plugins first. If you
have not done this yet, please do this now before continuing this step. If you would like to use Easy
Digital Downloads – Frontend Submissions for a multivendor marketplace please install and activate
this plugin first, too.
Importing demo content gives you a head start in which you mostly need to customize as you wish.
To import demo content, follow the next steps:
1. Log in as admin;
2. In the left panel go to Mayosis > Import demo content;
3. Choose the demo you would like to import. Because we like to give our user maximum freedom
in their preferences, we have made multiple demos with the page builders ‘Elementor’ and
‘WPBakery’. This means that you can import the demo with the page builder of your
preference;
4. After clicking ‘import’ please wait for a few minutes till all the demo content is imported.
You are all set; all the demo content is now imported and you should have the same website as the demo
4. Sidebar Header
Like previously stated, the Mayosis theme offers a header layout which makes the menu show in the sidebar. Here we can see how we can use this header layout.
The first step is to change the header layout from ‘Standard’ to ‘Sidebar’;
In the customizer there is a category called ‘Header’. Here you will find an option called ‘Sidebar’. There are various options to control from here.
The following element scan be changed:
Enable or disable the collapse of the menu from the top. When collapsing is enabled, the main logo will show in a expanded version. If you want to display a mini version of your logo (maybe an icon) you can upload this for the collapsed menu.
You can use your main menu as the sidebar menu, and use icons for menu items. For this you need fontawesome 4.7. In the ‘collapse sidebar’ options you can set: Only icon, Only text, Icon + text
This means that you get a lot of options here. For the mobile header, you can customize this from the header builder option in the customizer. There is no desktop option for now.
If need more help put a support ticket..
5. Add Custom Menu To EDD Frontend Submission Dashboard
If you want to add custom menu to EDD Frontend Submission Dashboard you have to follow these step.
You must use the Mayosis Child theme to add any code. Either way, the code will be replaced with a new theme update.
Edit the Mayosis Child themes functions.php file and add the below code to it.
function your_name_custom_menu( $menu_items ) {
    $menu_items['custom_menu_name'] = array(
        "icon" => "",
        "task" => array( 'custom_menu_name' ),
        "name" => __( 'Custom Menu', 'Text Domain' ), // the text that appears on the tab
    );
}
add_filter( 'fes_vendor_dashboard_menu', 'your_name_custom_menu' );
// make the new tab work
function custom_download_task_response( $custom, $task ) {
    if ( $task == 'custom_menu_name' ) {
        $custom = 'custom_menu_name';
    }
}
add_filter( 'fes_signal_custom_task', 'custom_download_task_response', 10, 2 );
// the content associated with your new tab
function edd_custom_menu_name_tab_content() {
//place your content here
}
add_action( 'fes_custom_task_purchase_history','edd_custom_menu_name_tab_content' );
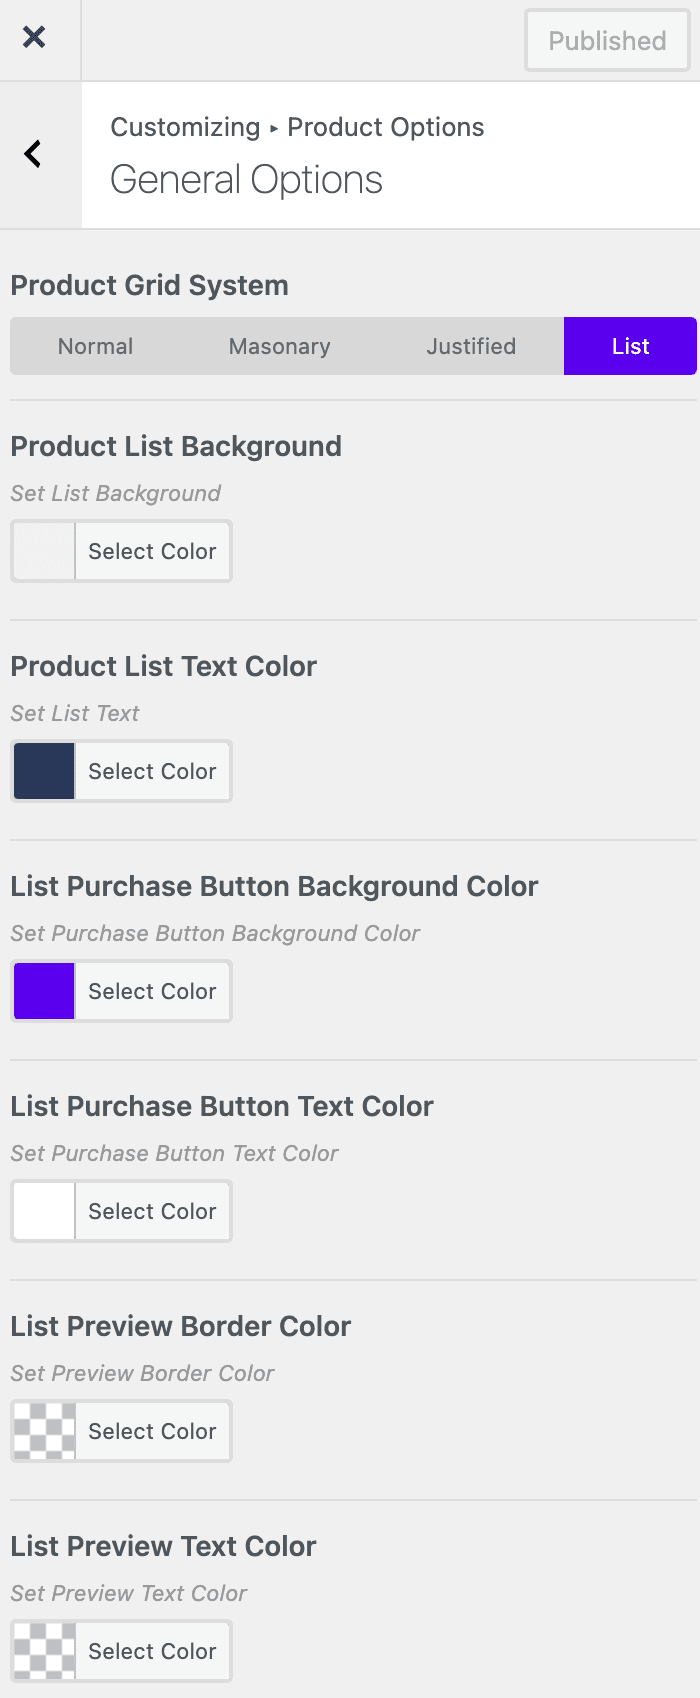
6. How to use list style product?
Mayosis has all types of grid and list systems. In that article, we'll look at how to use list-style items on mayosis.
Navigate to Mayosis > Theme Options > Product Options > General Options.
On top, we will find the "Product Grid System" Options.
Select "List" From the Options & save it.
We will find the list related all options under the "Product Grid Options".
This is the view of the list item.
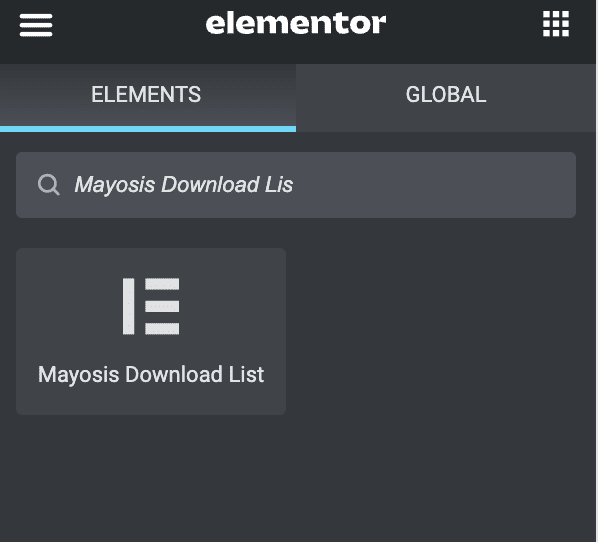
You can add the list item from the Elementor Page Builder too. Go to a page and edit with the Elementor. Search "Mayosis Download List" and add it to your desired place.
There are numerous customizing options, and that is much simpler. Enjoy the list block as is.
7. Page Builders Support for the Mayosis Theme
The Mayosis theme supports two awesome and feature packed page builders. These are
Elementor
WPBakery Visual page builder
Apart from the many features the page builders offer, there are 25+ custom builder elements added with the Mayosis theme, which help you create a perfect website.
A few of the custom Mayosis builder elements are:
ICON BOX: the icon box element offers a box with a icon, title and content. This element offers a lot of customization options. Users can upload custom icons or images for example, apply gradients on fontawesome icons and can change every single color of the box.
SINGLE BUTTON: users can add a single button anywhere with this element. A few of the options offered are that users can select button styles from global or custom, users can play YouTube videos with this button and can set icons, too.
DUAL BUTTON: this element offers the same set of functionalities as the single button element, but displays a set of two buttons.
RECENT POST: users can add recently added blog posts in a grid with this element. There are a lot of options that this element offers, like number of columns and post amount.
CLIENT LOGO GRID: users can add their client logos in a grid with this element.
THEME HERO SECTION: this is an awesome element which gives users the option to display a title in three parts: prefix content, counter, suffix content. There is real-time user counter available, and custom counts can be set also.
TESTIMONIAL: this element displays the testimonials that a user can add from the WordPress menu in the back-end. The testimonials are highly customizable.
PRICING TABLE: this element displays a pricing table with a lot of customization options.
SEARCHBOX: this element displays a searchbox which searches the Easy Digital Downloads products. The element also offers a category dropdown.
COUNTER: with this element users can add counters anywhere they want. The counters are real time and can be used to display total users, total products or total download count for example.
TEAM MEMBER: with this element a user can display team members in different styles.
LICENSE: this element displays the licensing terms on a page. The licenses can be added in the WordPress menu in the back-end.
SLIDER: this element adds a slider on a page. The element can be customized and the sliders can be added in the WordPress menu on the back-end.
SHAPE: this element makes it possible to a dd abstract shapes with a parallax effect. Users can use custom images, change colors and change shapes.
MODAL: this element makes it possible to add modals and generate an ID. This ID can be used in the single or dual button element, to display a pop-up, for example.
SEARCH TERMS: this element displays the search terms for a visitor and can be customized.
EDD FEATURED: show EDD featured products with this element. You can customize the grid to your preference. This element is highly customizable both in the page builder as well as the theme options.
EDD RECENT: show EDD recently uploaded products with this element. You can customize this grid to your preference. This element is highly customizable both in the page builder as well as the theme options.
EDD RECENT SMALL GRID: this element is the same as the ‘EDD RECENT’ element, but displays a small grid for the recent products.
EDD POPULAR: users can show popular products in a grid with this element.
EDD MASONRY GRID: users can show a masonry grid with this element. This is suitable for photographers for example.
EDD JUSTIFIED GRID: users can show a justified grid with this element. This is suitable for photographers for example.
EDD CATEGORY GRID: users can show Product Categories in a grid with background images. The background images can be uploaded for each category separately, which gives the user a lot of flexibility.
EDD PRODUCT BLOCK: this element displays a single column product block for a product.
EDD FES Author: this element shows featured products by an Author ID from FES, which you can of course set.
EDD LOGIN: show the EDD login form with custom styles.
EDD REGISTRATION: show the EDD register form with custom styles.
8. Header flex layouts
Each part (row) of the header has three columns, with width proportions that can be set in two variants.
Variant #1: Flexible middle column
The first variant is called ‘Flexible middle column’ and is set by default for all rows. The main feature of this variant is that left and right columns will take their width from the width of the elements that are added inside them. The middle one will then be flexible between them and take all the free space. This layout is preferable if you place your logo image in the left column and additional icons in the right column. This means that the main navigation element takes the full width, since this is your middle column.
Variant #2: Equal right and left columns
The second variant is called ‘Equal right and left columns’. With this variant the right and left columns are equal and they take all the free space in that row. The middle one will adapt to the width of the elements placed in it. For example: you choose to set a logo with a width of 150px in the middle column. The column in which this logo is placed, will not be any wider. The left and right column will take all the remaining space. This variant is very useful if you prefer to center a element (or logo) in the middle column.
9. Header Builder
We have introduced a new and modern way to create and configure your website header without any coding knowledge needed. With our new Mayosis Header Builder you can easily customize the top part of your website and add any element you want there. To make it even easier, the Mayosis theme comes with a library with elements/logos for menus, carts, HTML blocks, social buttons, search forms and even more! You can arrange these elements in any order you want, which gives you maximum freedom and flexibility. You can even create different layouts for desktop and mobile devices easily to give users a responsive experience. All of this without any code modifications, how cool is that?
You can find Mayosis Header Builder manager interface in Appearance -> Customize -> Mayosis Header. Here you are presented with a list of header items, and can edit them, create new ones or delete them
10. Header rows and columns configuration
When you edit your header with the Header Builder you can see an area with three rows that contain three columns each. They represent the three parts of your website header: the top bar, the main header and header bottom part. All of these columns are drag & drop container areas, which makes it possible to add any elements inside them and simply drag & drop them between columns. This way, you can compose any kind of layout and set any order for your header content elements.
Each part of the header has its own settings and you can click the “Edit” icon to configure their height, colors schemes, borders and more. On this configuration popup, you can also mark this row to be stuck on scrolling, hide on mobile and/or on desktop devices, add bottom border line, set a background color and choose row layout structure. To sum this all up in one sentence: there are so many options that are available, that you can truly give your website an own unique style
11. Create Video Product
Want to create a video site with Mayosis? Don’t worry. It’s straightforward to use. mayosis Has all options, including video Player.
Here are the steps to adding Video Product:
Add a Download
Choose Product Format Video
Upload Video File for demo play
Do the other necessary things like price add, Downloadable file upload, Thumbnail, etc.
Use Elementor Regular grid or Feature Grid to show the video product grid on the page.
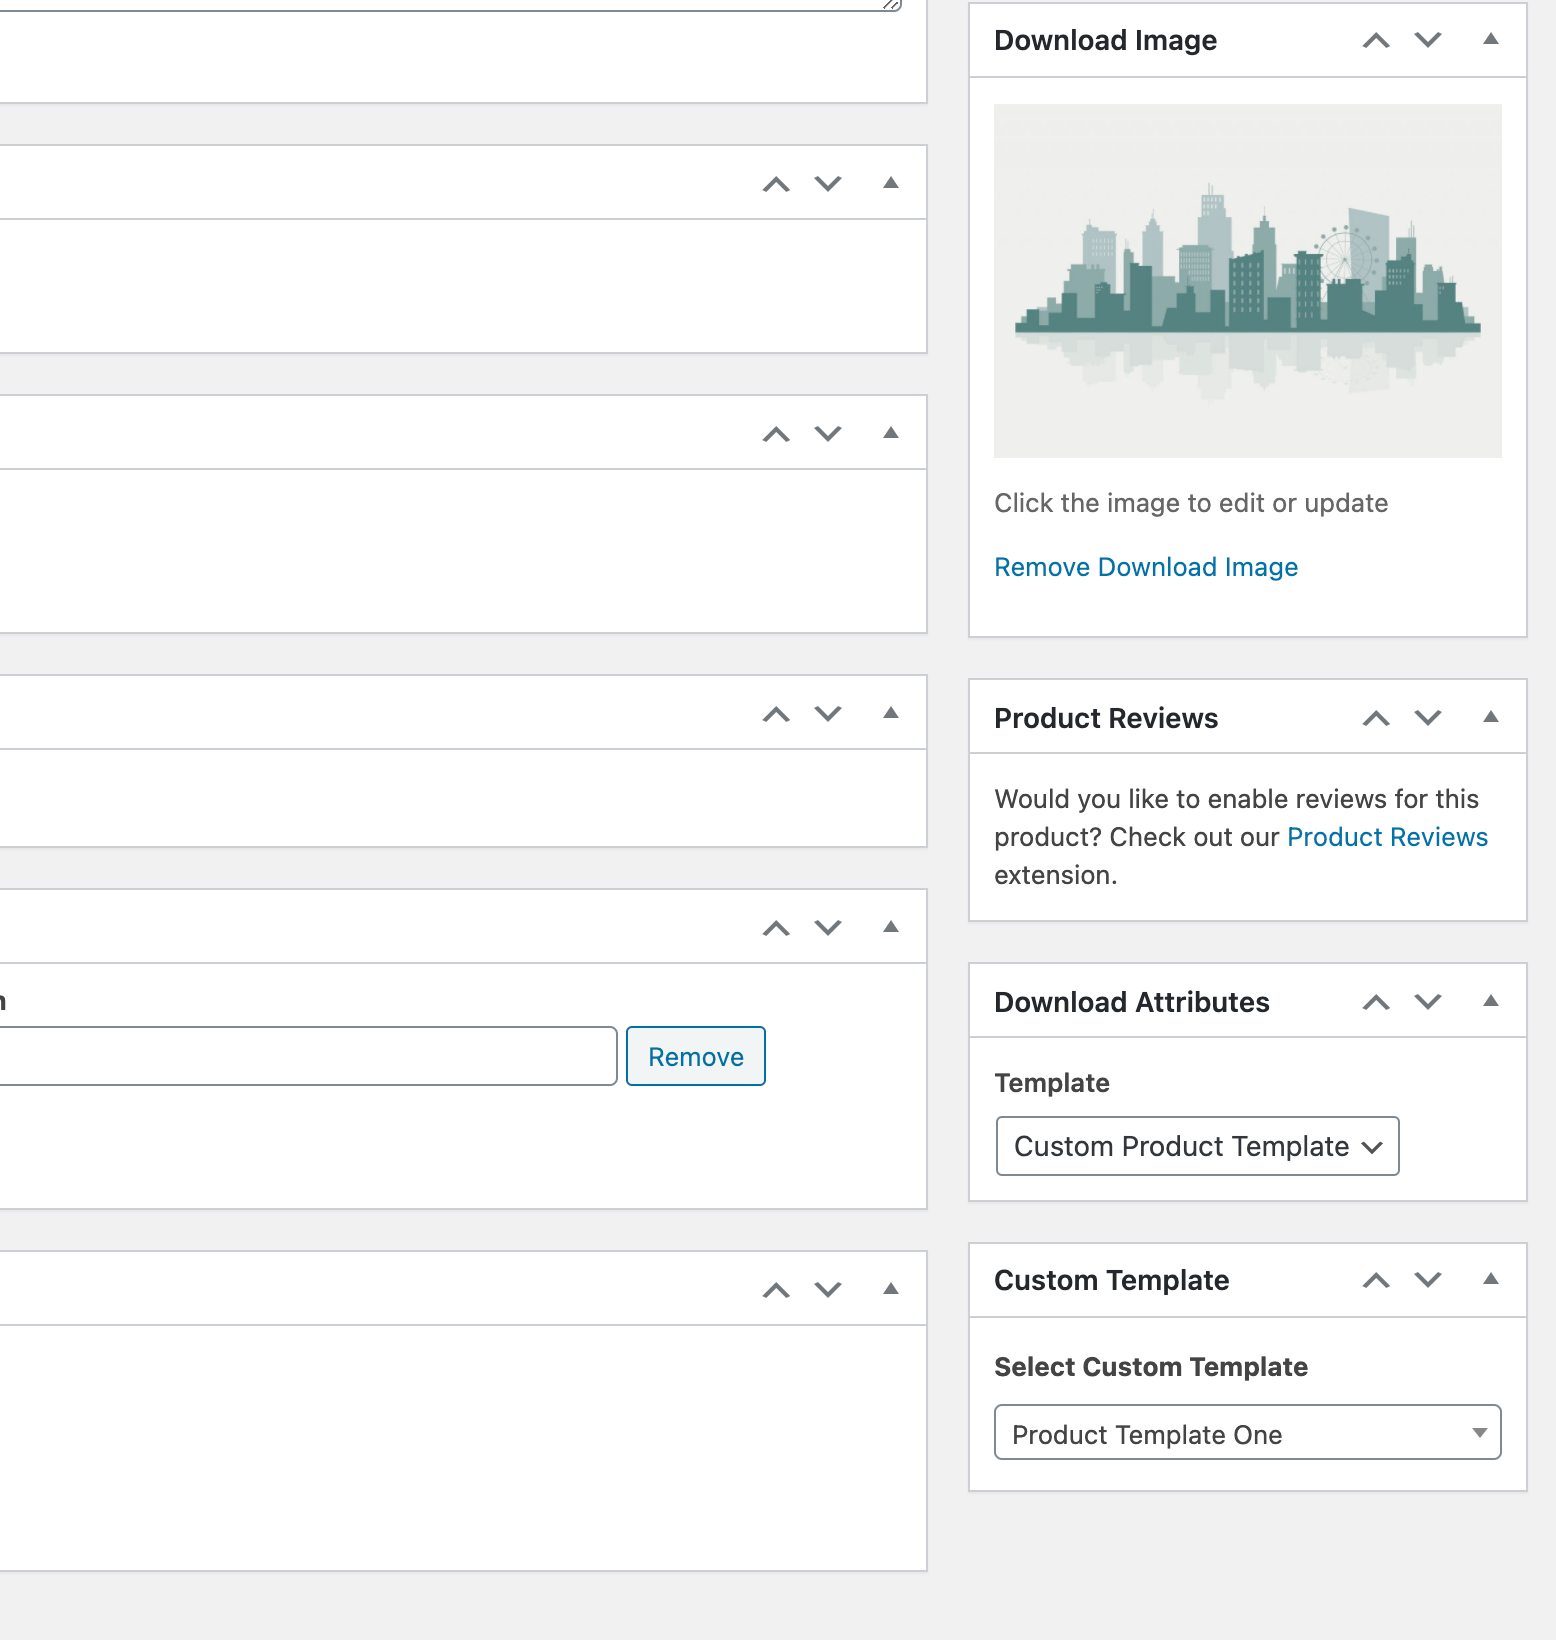
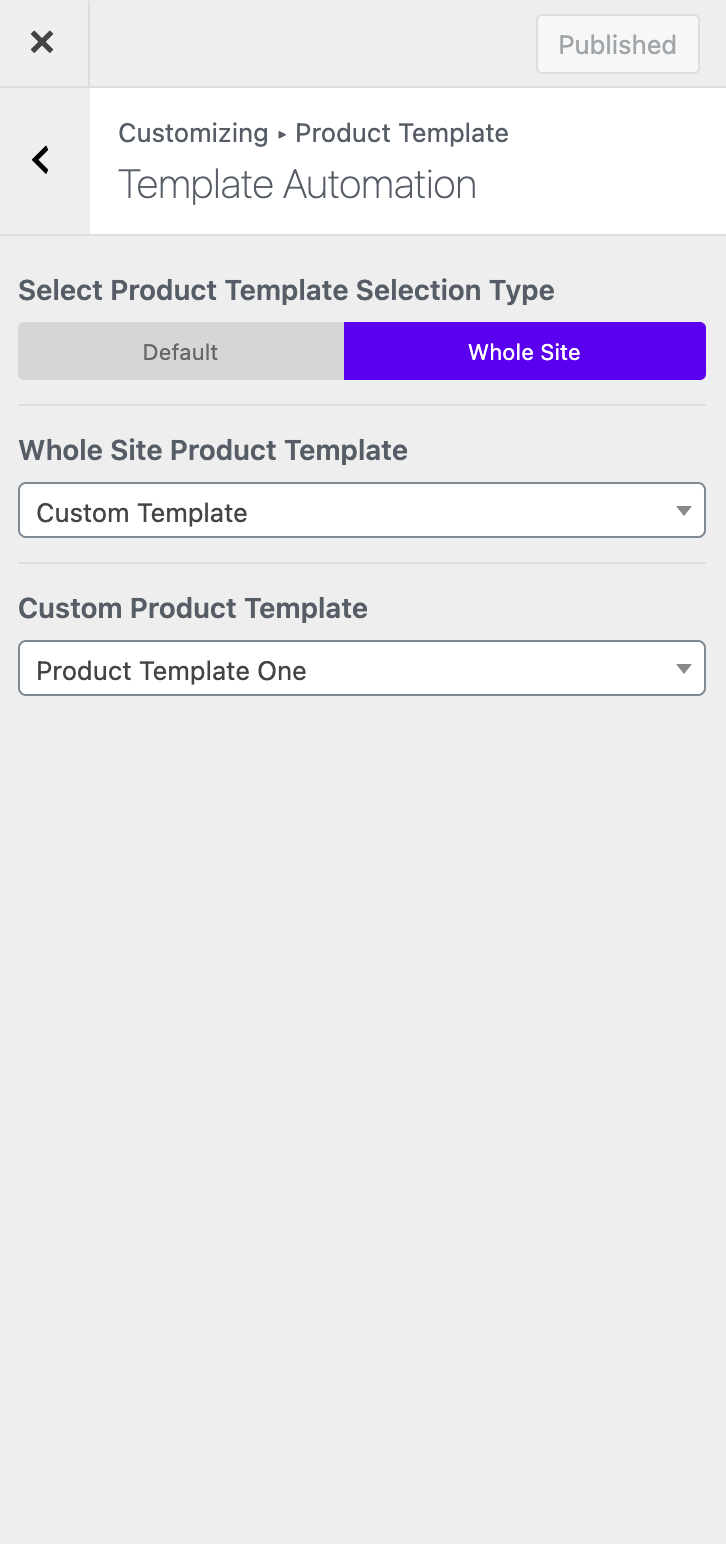
12. How to create a new product template?
Introducing the New Product Template Option on Version 3.0. So let's start to learn how to use it. Our product template powered by Elementor.
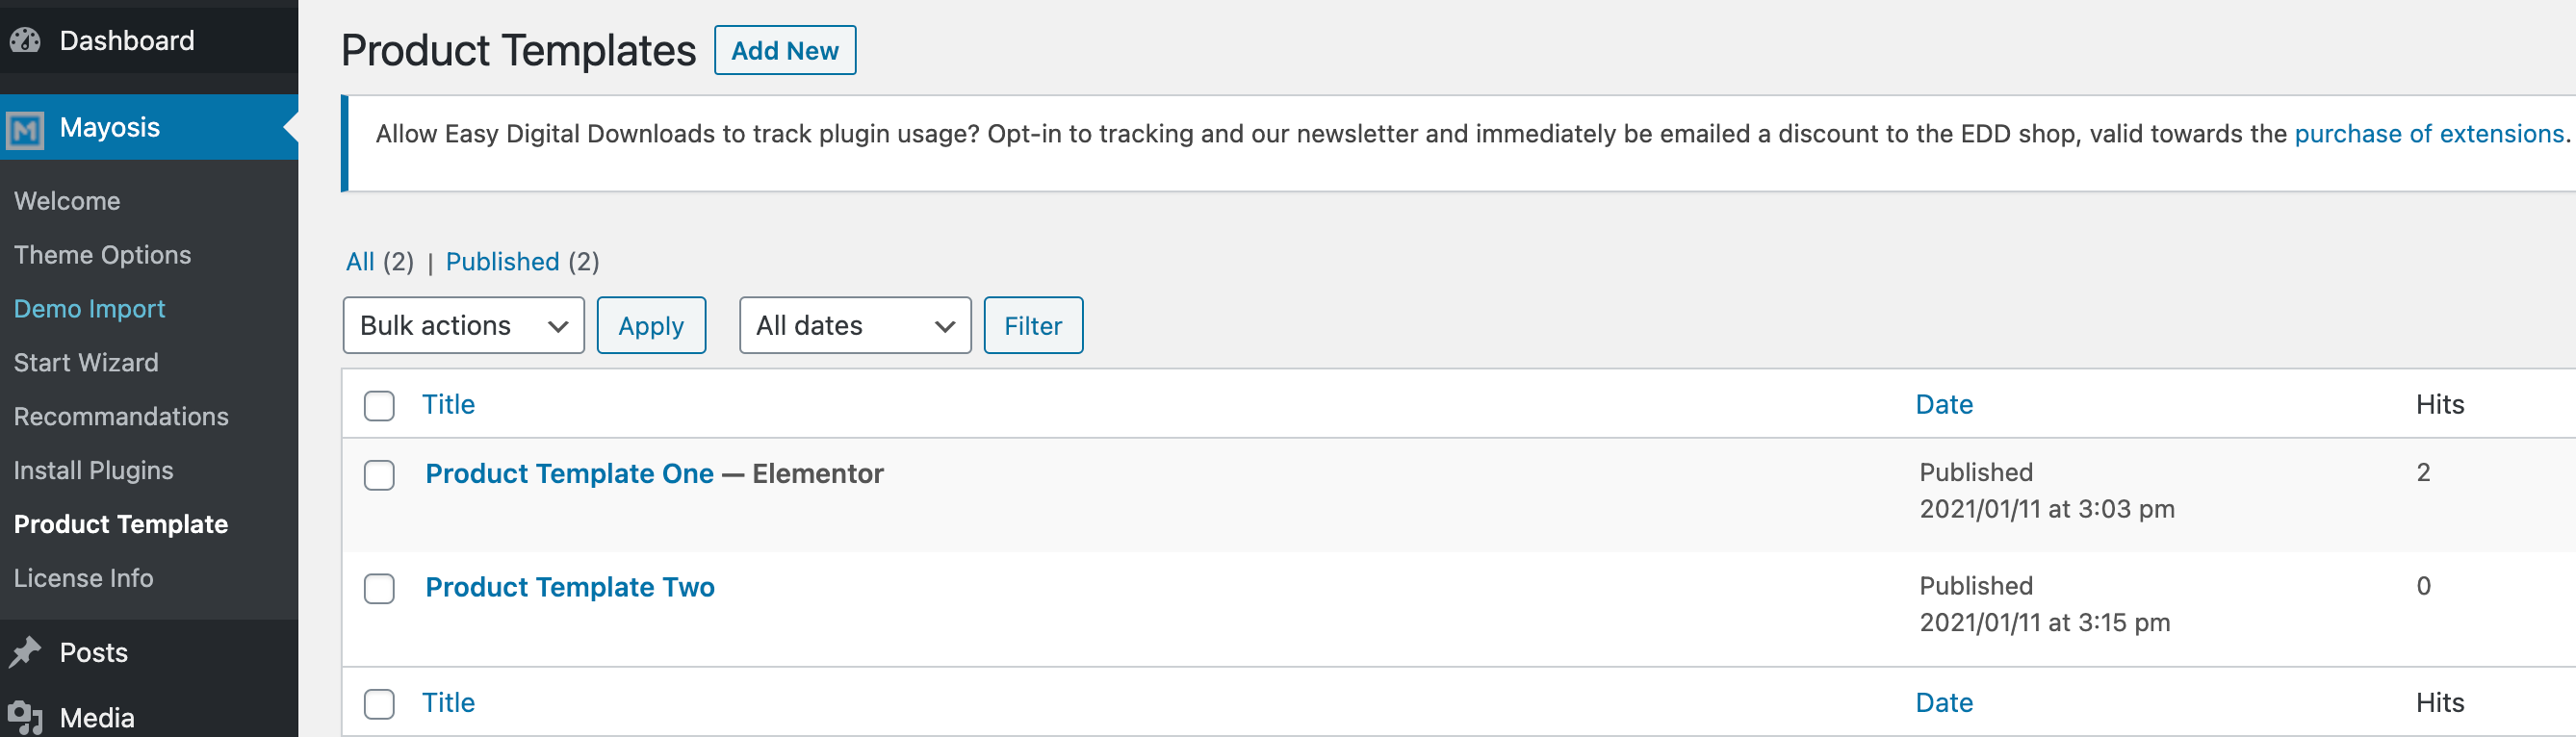
Step 1. At first, you have to go to Mayosis> Product Template
Step 2. Add a template and edit it with Elementor.
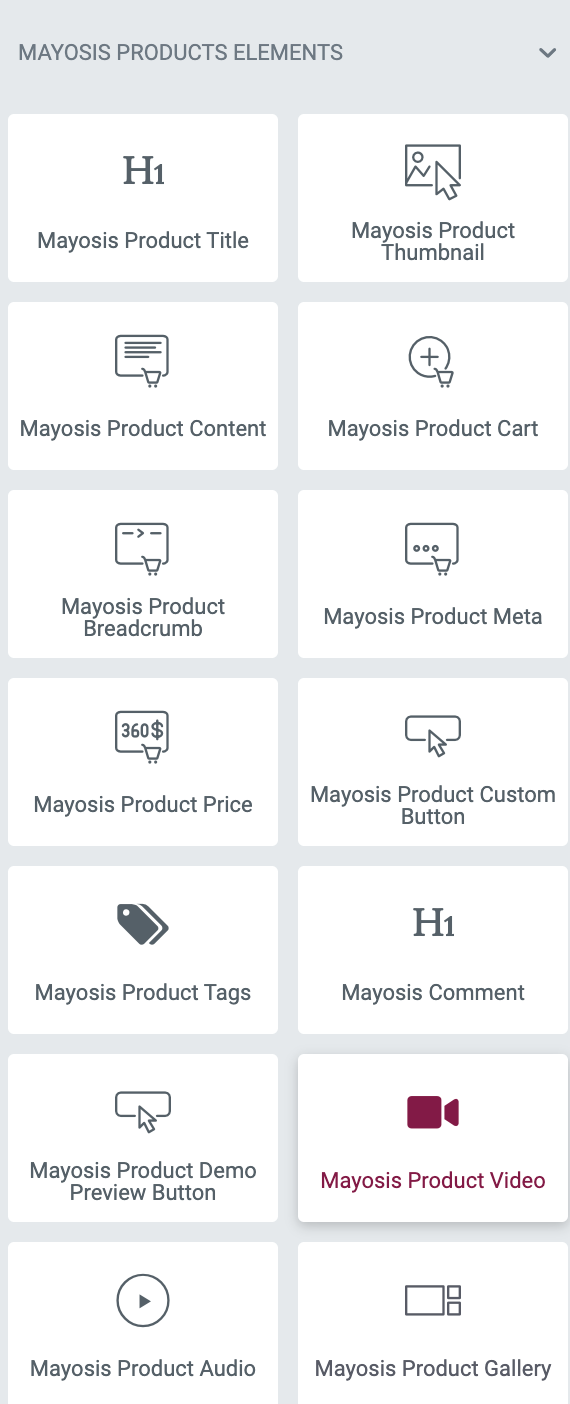
Step 3. You will find necessary custom elements under Mayosis Product Elements.
Step 5. Now time to set a product template for the live product. You can do it for single products or global products.
For Single product. Go to the single product & edit it Choose the Custom product template from Download Attributes & choose the template name from below.
For Global. Go to the Mayosis > Theme options > Product Template > Template Automation Select Whole site. After that select custom template & template name.
Hopefully, You guys love our product templating system. We are making lots of custom elements too.
13. How to enable vendor profile cover photo upload option?
If You want to enable the vendor cover photo upload option just follow few simple options to achieve it.
Go to the FES> Profile Form add the Cover photo from Extension Created Fields.
From Frontend User will get the cover photo upload option from dashboard > Profile.
That's it very simple process.
14. How to add audio playlist on FES Submission form
At first go to the theme option > Product options > Audio options. After that enable the "Audio Custom Taxonomy" Option from there.
Enable another option called "Audio Playlist for FES" from the same menu.
3.Copy the action hook called mayosis_audio_playlist_hook .
4.Go to the FES Submission form & add an action hook field. Add the mayosis_audio_playlist_hook on that field & save it. You are done. The playlist will appear on FES Form.
15. Installing WordPress
Since Mayosis is a WordPress theme, WordPress needs to be installed on your webserver. Many
hosting providers provide an easy to use installer called Installatron, which is available in your CPanel.
If your hosting provider does not offer this option, WordPress can still be easily installed. Please visit
http://WordPress.org and download the most recent version of WordPress. After downloading the
Add the API In Mayosis> Theme Option > Product Options > Envato API
After that Add product & provide the Product ID Inside Product Field Called Envato Product ID
After Add product ID All product Information pull from Envato.
18. How to add the featured vendor on any page
Remember that FES is a necessary plugin in order to insert featured vendor widgets in any pages.
1. Edit your page with Elementor and search Mayosis Downloads vendor.
2. Drag it and set it to your desired place in the builder.
3. Add your selected vendor ID with commas. You can add multiple IDS with comma
4. Select your widget style & customize as per your needed. You are done.
19. Use a Child Theme
Run the Wizard from Mayosis> Start Wizard. After starting the wizard you will find a step to create a child theme. just create & install the child theme.
It's very easy. After that, you will able to add custom codes to the child theme.
If you think still you need the child theme! You can download it from here. Download
That's It. Need more help? create a support ticket.
20. Download Template
The Mayosis theme is powered on the Easy Digital Downloads system to provide the awesome digital
marketplace. For these digital downloads, a few templates can be set. The available templates are:
Available Templates:
1. Default Template
2. Full-Width Template
3. Narrow Content Template
4. Photo Template
5. Prime Template
Each offers a unique look and feel to your download/product pages.
The download templates can be set when editing a download, or by going into the Customizer >
Appearance > Template
21. How to set fixed Image size for the regular grid?
You can follow our guidelines if you wish to upload images in a variety of sizes to EDD Featured Images.
Navigate to Mayosis > Theme Options > Product options > General Options.
After Scrolling you will find the select options called "Product Grid Image Size" . Select the "custom" option from there.
Now Set width & height by following the screenshot
From the next upload your images will be resized.
You can resize previously uploaded images by following the instructions below.
Guidelines for Resizing Already-Uploaded Images
1. Go to Plugin & add new plugin "Regenerate Thumbnails"
2. Navigate to Tools > Regenerate Thumbnails.
3. Regenerate all thumbnails.
That completes the article. I really hope that helps you a lot.
22. Configuring the menu
If you want to create a menu or change the menu imported by the demo, you can do so. To do this,
follow the next steps:
1. Log in as admin
2. In the left panel go to Appearance > Menus
3. Here you can change the menus, and also change the menu locations.
More information about using WordPress Menus can be read in the Codex, here:
The “edd_currencies” filter allows you to easily add support for your own additional currencies to Easy Digital Downloads.
Let’s say, for example, that you want to add support for the Indian Rupee (already supported, so this is only an example). The sample function below would add the support:
The array key is the currency code and the value is the currency label.
Note: It is important that you know that not all payment gateways support all currencies. Check to make sure that your chosen gateway supports the currency you wish to use before launching your store. Once added, test purchase to confirm the gateway uses the correct currency.
Currency codes may also be added without using any code through this plugin
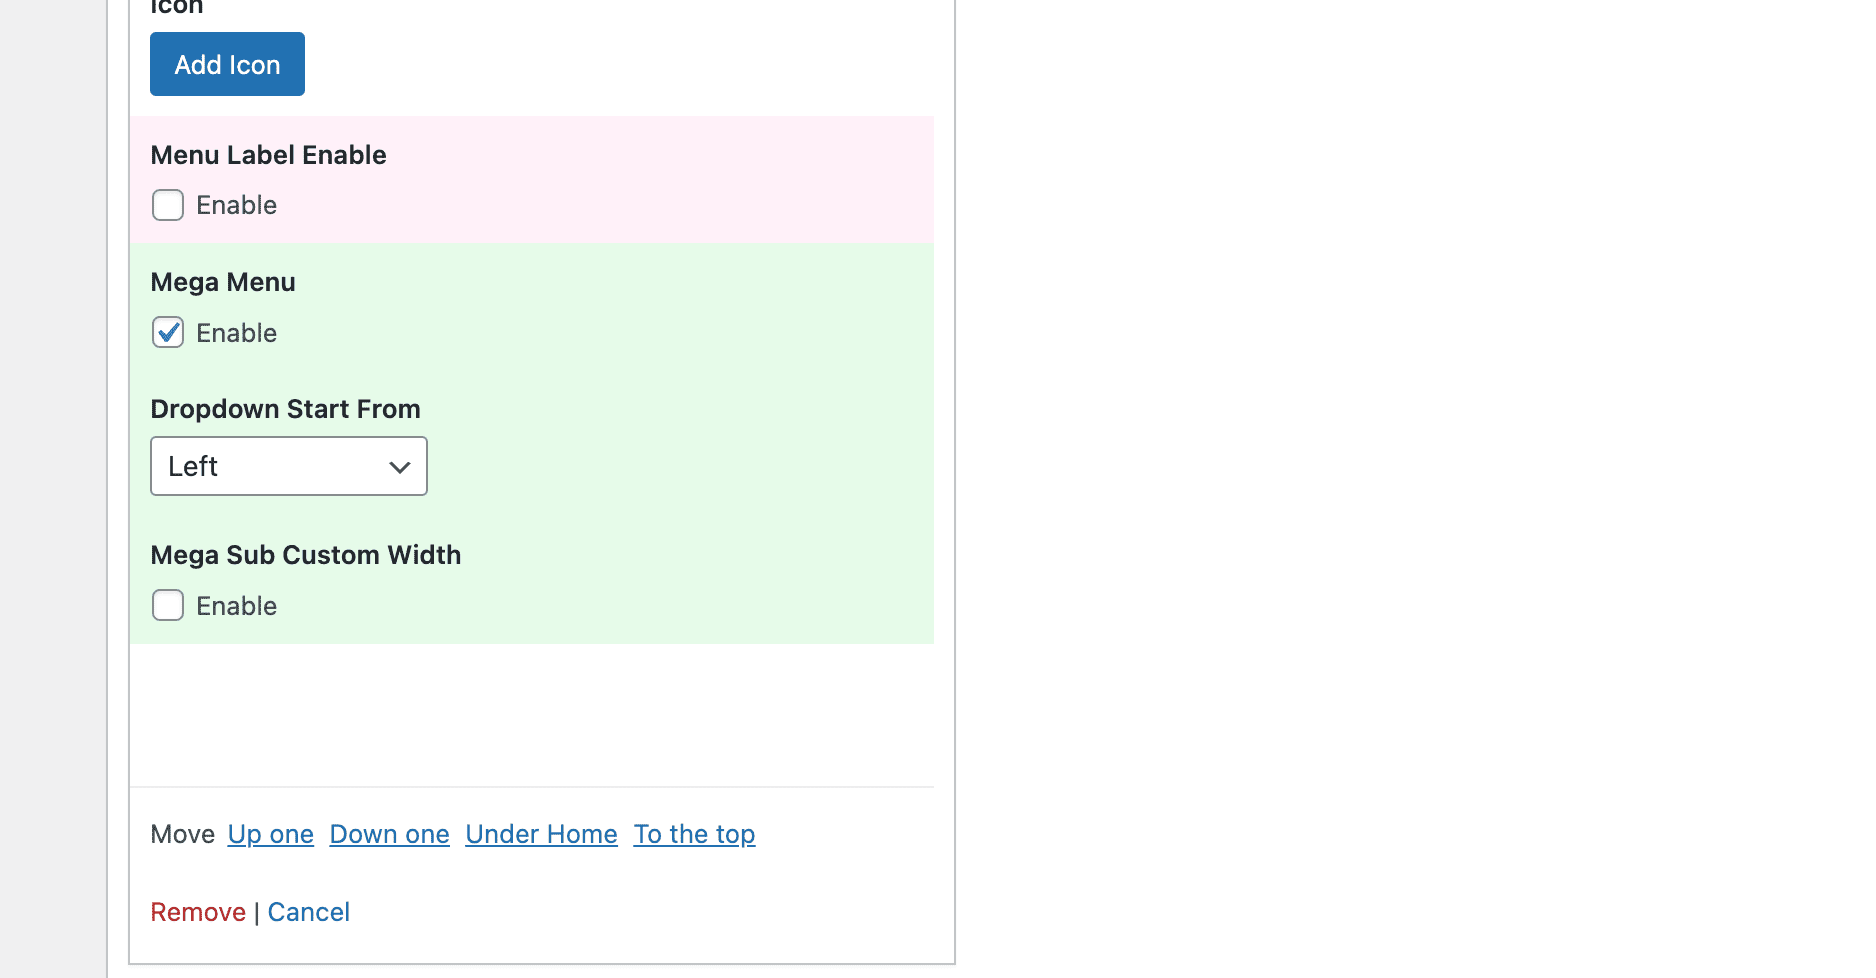
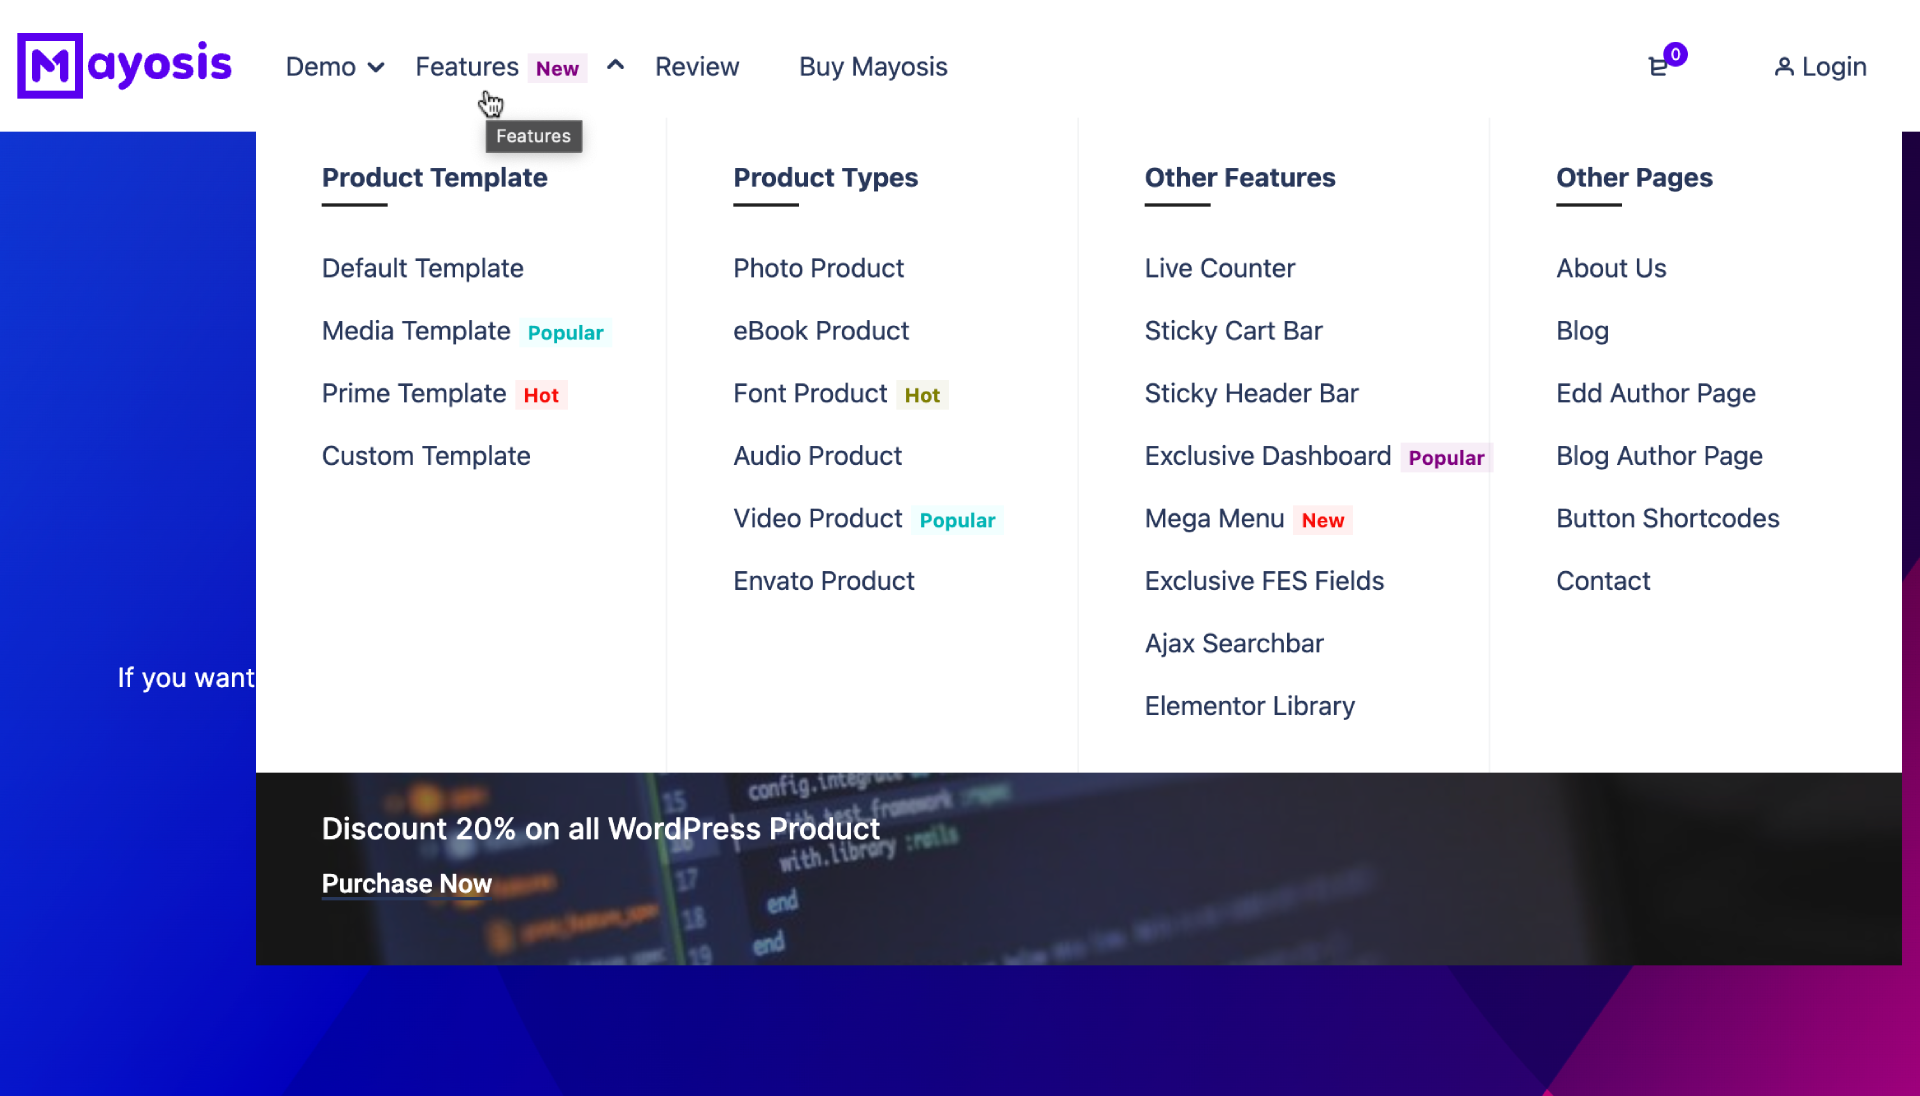
24. How to Use Mega menu?
1. At first, enable the Mega menu from the Customizer option panel. There you will find mega menu color options. Typography options are included in typography.
2. Now go to the menu from Appearance & After that open the menu item (in the first level) which you want to have a dropdown Megamenu, and check the box “Megamenu”
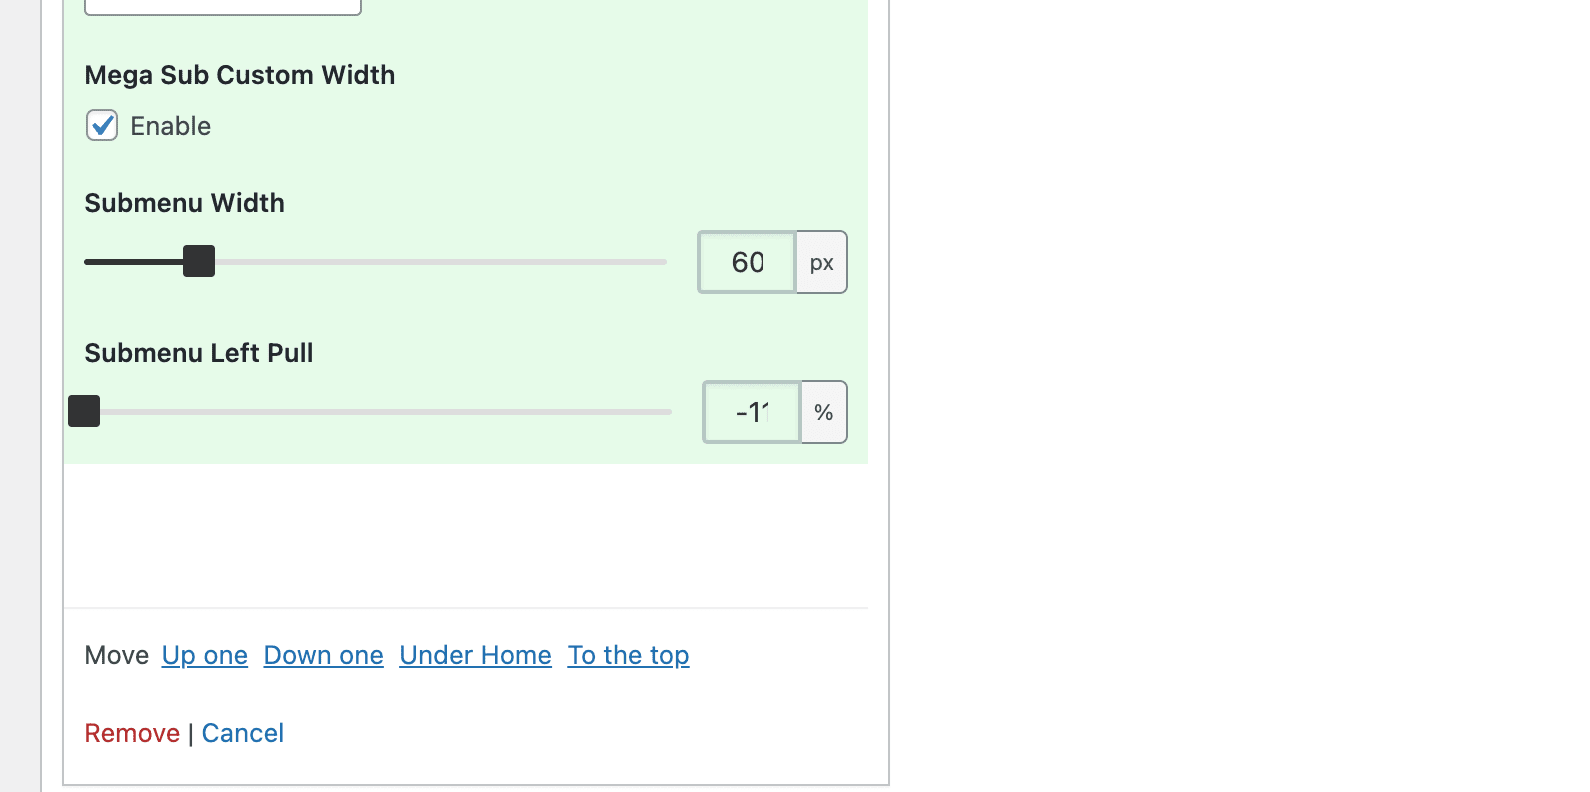
Megamenu size
You will be able to set the custom width of mega menu. Set width & pull left by the negative or positive value.
Adding columns to your Mega Menu:
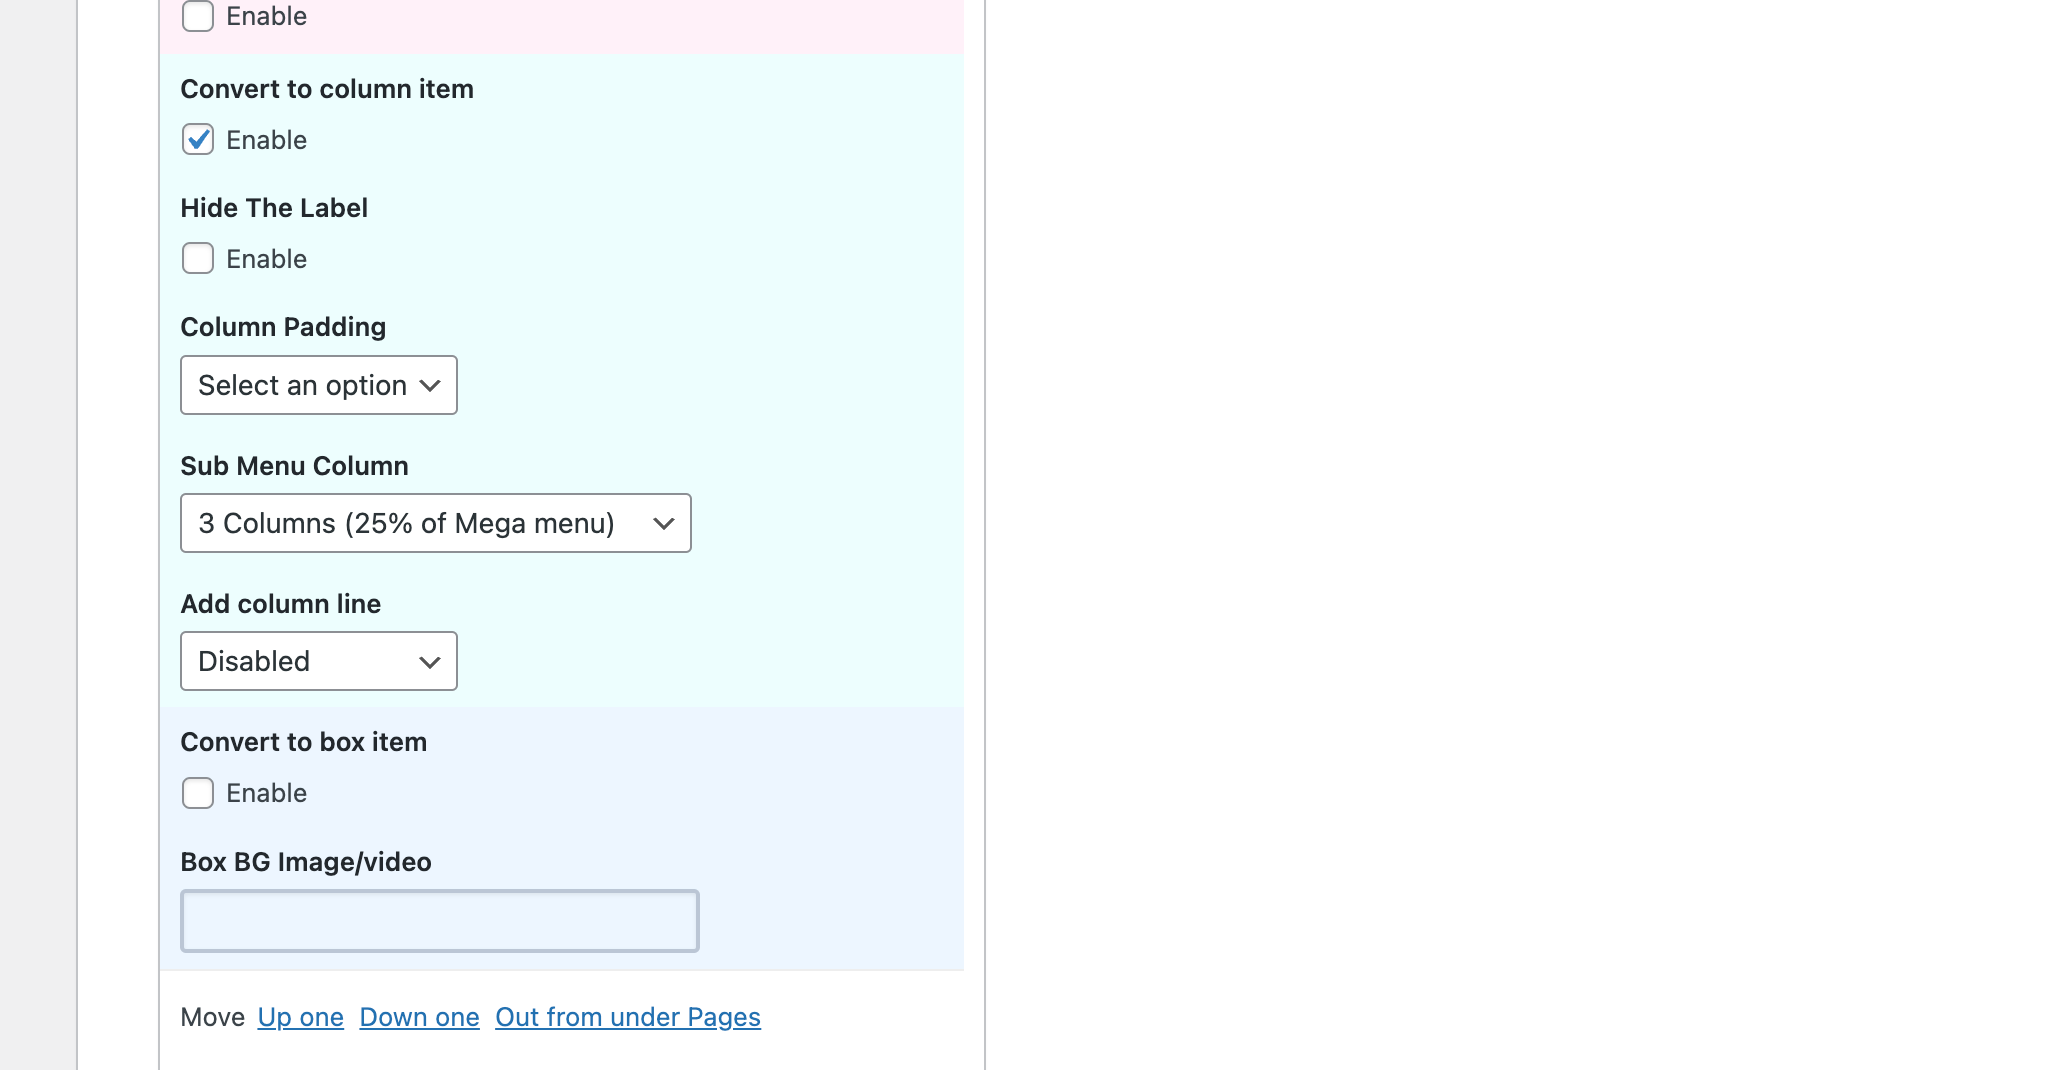
To add columns to your mega menu, add a custom link from the left area with a link as “#” and the link as the desired title of the column inside the Megamenu (for example: About us), and add this custom link under the main mega menu main item (as second-level item), and check the box “Convert to column item”, you can also choose the desired column width of this column, or you can change the style of the column by adding padding or lines.
You can now add any number of columns the same way inside the mega menu, and the columns can be in any different sizes depending on the style that you want to build.
You can set a title for the whole column via the “Hide the Label field of that column item in your menu
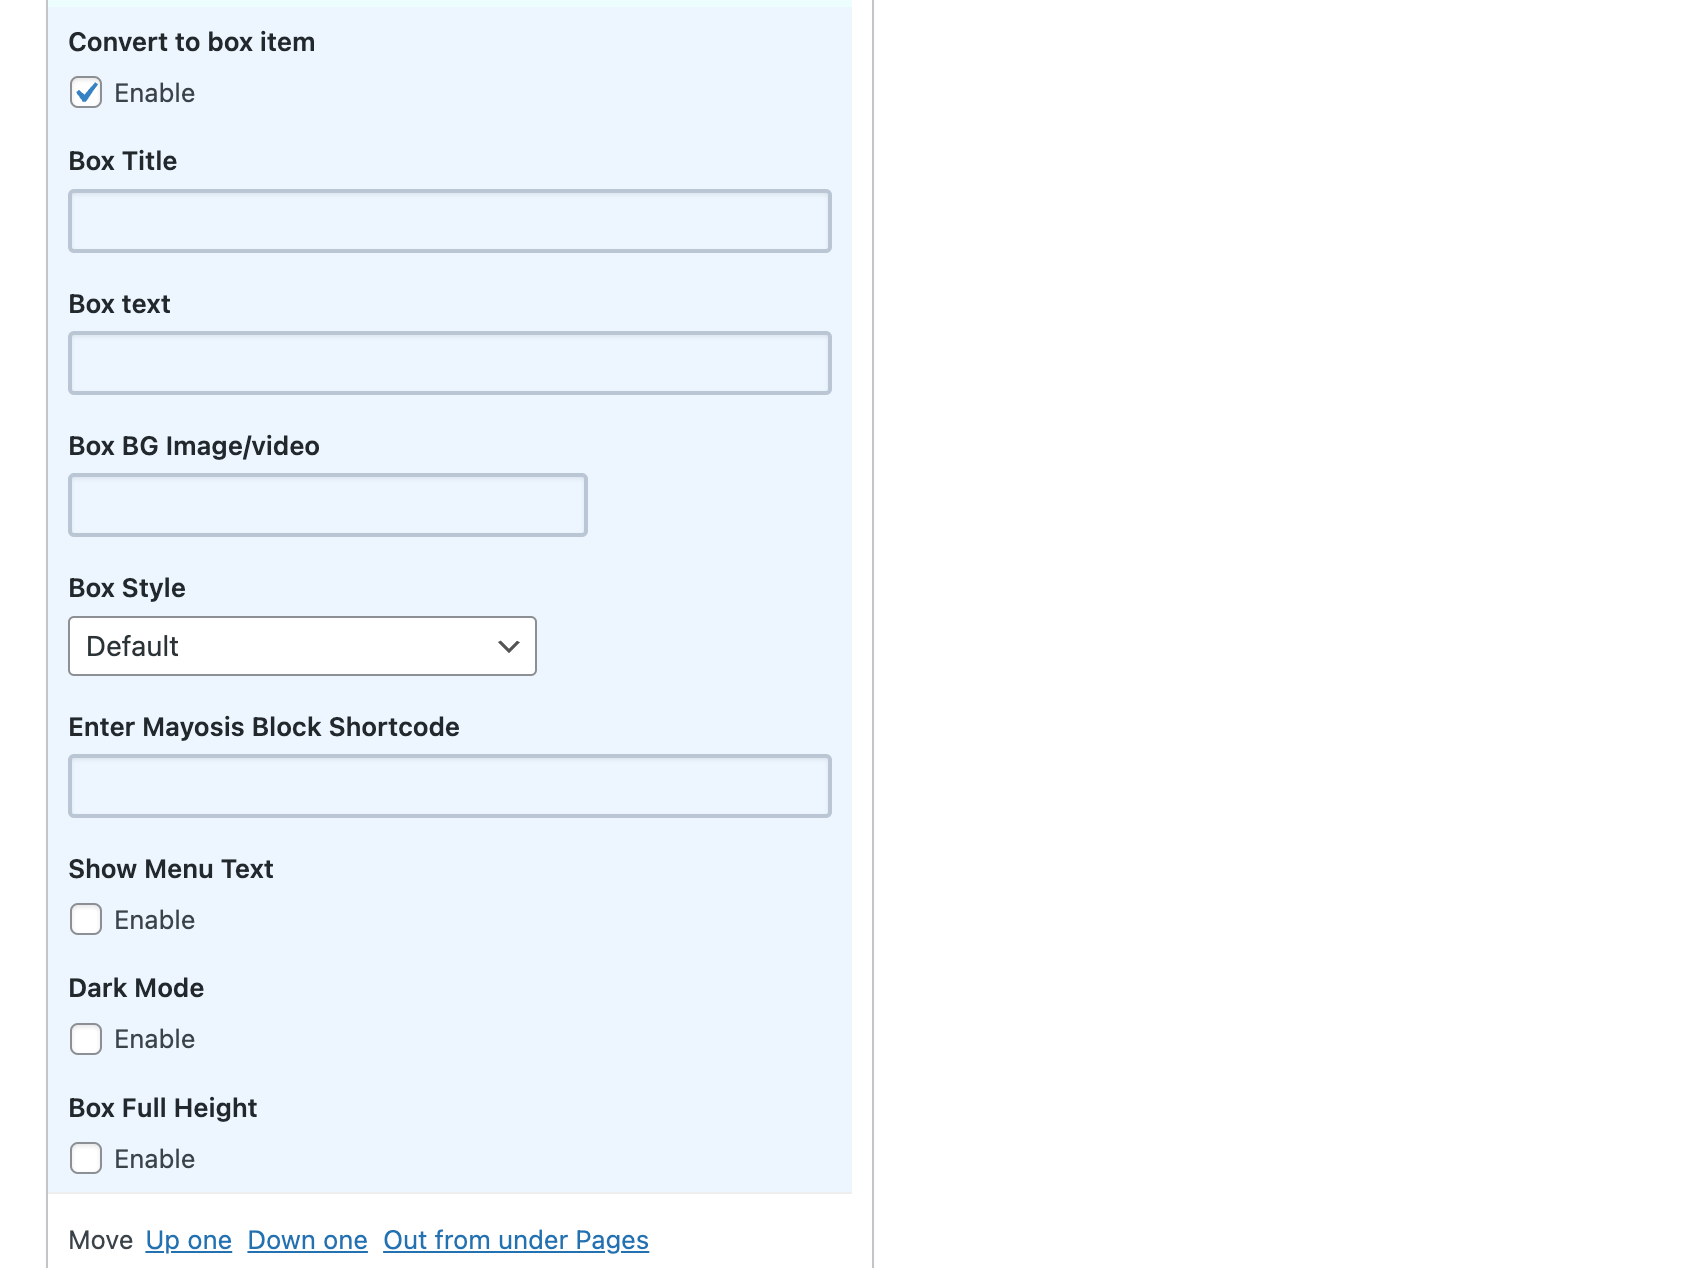
Adding menu banners or Elementor Content
In addition to normal links, you can add advanced items to the mega menu like the image or video banners, to do so add any menu item inside the mega menu then open its options, then check the box “Convert to Box item” and choose the desired Title and text, and choose an image/video, you can also change box style or its height or the color of the text inside the box. Also, add Mayosis Block Shortcode To show Elementor custom content. That's much easy to show your Elementor column or anything by elementor by shortcode.
This is much easier to handle. If need more help please create a ticket.
25. Setup Fontier Plugin with Mayosis
Create EDD Download Category. Then Go to the settings > Fonter Options & select Your category in Which category font preview render.
2. Do necessary color option edit & Demo text update from the Settings.
3.Zip your font in a folder. The Fontier currently supports only the TTF version only. So keep at least one TTF inside the folder. Upload that on Download File URL. Also must Select the category that you mentioned on Fontier settings.
4 Just publish your EDD product. Fontier will unzip the folder & render your font on the single product page.
26. Global header settings
In the ‘Global header settings’ you can change the settings of various subjects. You can for example change the header layout, the header type and the form field type
Header Layout: There are two types of header layouts available in the Mayosis theme. These are the standard mode and the sidebar mode. After selecting one of the two layouts, you can, of course, rearrange them.
Header Type : There are two types of header types available. By default, the normal header is set. If you prefer a transparent header then you can choose for the ‘stacked’ mode and reduce the opacity of every header color for the different header parts.
Form Field Type : There are two form field types. ‘Solid’ is for form fields without a box, and ‘border’ is for form fields with a box..
27. Header Mobile & Tablet settings
Our header builder has two different areas to add your elements for desktop and mobile devices. The area for large devices is applied for devices resolutions starting from 1025 pixels in width. Used for laptops, desktops and other larger screens. And another one is for 1024 pixels and smaller. It is for tablets in vertical and horizontal mode and for smartphones. You can switch between these two areas using “Desktop layout” and “Mobile/Tablet layout” buttons in the header toolbar.
So to configure your header responsive layout, you just need to switch to mobile devices area and add elements you want to see on smaller screen in the same way you do this for desktop devices. In general, we suggest you keep your mobile layout as simple as possible. Use only very basic elements there like the logo, mobile menu, cart widget. You can add some extra information in the top bar column as well if necessary.
28. iOs Video Preload Issue
The HTML5 video element has an attribute loop that doesn’t work on iOS. That’s why the video shows black screen. In that case we have one solution. Please add Featured image in every video product & enable the Thumbnail Video Poster from theme Option
Follow the tree. Mayosis > Theme Option >Product Options > Video Grid Options > Thumbnail Video Poster . Enable the option. Then the featured image will load as a preload image.
29. Configuring the front page and the blog page
You may need to set your front page and/or blog page yourself, or you may want to change these
pages.
To do this, follow the next steps:
1. Log in as admin
2. In the left panel go to Settings > Reading
3. Choose the pages for both the front page and the blog page.
You have now set a front page and blog page.
30. Header Builder
We have introduced a new and modern way to create and configure your website header without any coding knowledge needed. With our new Mayosis Header Builder you can easily customize the top part of your website and add any element you want there. To make it even easier, the Mayosis theme comes with a library with elements/logos for menus, carts, HTML blocks, social buttons, search forms and even more! You can arrange these elements in any order you want, which gives you maximum freedom and flexibility. You can even create different layouts for desktop and mobile devices easily to give users a responsive experience. All of this without any code modifications, how cool is that?
You can find Mayosis Header Builder manager interface in Appearance -> Customize -> Mayosis Header. Here you are presented with a list of header items, and can edit them, create new ones or delete them
31. Fix the social share plugin issue
Recently Mayosis Packaged Easy social share plugin. This plugin has huge option to make easy social share. After activating this plugin many user facing an issue about the social share box empty as like the below picture.
To fix this issue please follow the guideline at first go to Easy social share buttons > import/export.
Go to import & copy the code from below & paste on import box & import the settings. Your issues will be fixed
{"afterclose_type":"follow","afterclose_like_cols":"onecol","aftershare_optin_design":"design1","networks":["facebook","twitter","pinterest"],"more_button_func":"1","share_button_func":"1","share_button_counter":"hidden","twitter_message_optimize_method":"1","subscribe_function":"form","subscribe_optin_design":"design1","subscribe_optin_design_popup":"design1","mail_function":"form","mail_function_security":"level1","flattr_lang":"sq_AL","style":"59","button_style":"button","counter_pos":"hidden","total_counter_pos":"hidden","fullwidth_align":"left","fullwidth_share_buttons_columns":"1","counter_mode":"360","counter_recover_mode":"unchanged","counter_recover_protocol":"unchanged","counter_recover_prefixdomain":"unchanged","twitter_counters":"self","force_counters_admin_type":"wp","esml_history":"1","esml_access":"manage_options","ga_tracking_mode":"simple","pinterest_template":"32","pinterest_button_style":"button","pinterest_position":"top-left","pinsc_template":"32","pinsc_button_style":"button","pinsc_position":"top-left","opengraph_tags":"true","sso_imagesize":"true","twitter_card_type":"summary","twitter_shareshort":"true","shorturl_type":"wp","shorturl_bitlyapi_version":"previous","affwp_active_mode":"id","user_network_name_facebook":"Facebook","user_network_name_twitter":"Twitter","user_network_name_google":"Google+","user_network_name_pinterest":"Pinterest","user_network_name_linkedin":"LinkedIn","topbar_contentarea_pos":"left","bottombar_contentarea_pos":"left","flyin_position":"right","sis_network_order":["facebook","twitter","google","linkedin","pinterest","tumblr","reddit","digg","delicious","vkontakte","odnoklassniki"],"sis_position":"top-left","sis_style":"tiny","sis_orientation":"horizontal","heroshare_second_type":"top","postbar_button_style":"recommended","postbar_counter_pos":"hidden","point_position":"bottomright","point_open_auto":"no","point_style":"simple","point_shape":"round","point_button_style":"recommended","point_template":"6","point_counter_pos":"inside","mobile_sharebuttonsbar_count":"1","sharebar_counter_pos":"inside","sharebar_total_counter_pos":"before","sharepoint_counter_pos":"inside","sharepoint_total_counter_pos":"before","display_excerpt_pos":"top","content_position":"content_manual","subscribe_connector":"mailchimp","subscribe_css_always":"true","use_minified_css":"true","use_minified_js":"true","essb_cache_mode":"full","apply_clean_buttons_method":"default","essb_access":"manage_options","turnoff_essb_advanced_box":"true","display_in_types":["post","download"],"mayosisfloatingposition_template":"18","mayosisfloatingposition_button_style":"icon","mayosisfloatingposition_counter_pos":"hidden","mayosisfloatingposition_total_counter_pos":"hidden","mayosisfloatingposition_fullwidth_align":"center","mayosisfloatingposition_fullwidth_share_buttons_columns":"1","mayosisfloatingposition_more_button_func":"1","mayosisfloatingposition_share_button_func":"1","mayosisfloatingposition_share_button_counter":"hidden","button_position":["mayosisfloatingposition","mayosisproductbreadcrumb","mayosisproductbottom","mayosisphoto","mayosisoverlay"],"live_customizer_disabled":"true","mayosisfloatingposition_activate":"true","mayosisfloatingposition_networks":["facebook","twitter","pinterest","linkedin","buffer","print"],"autoset_networks":["mayosisfloatingposition"],"user_network_name_del":"Del","user_network_name_stumbleupon":"StumbleUpon","user_network_name_vk":"VKontakte","user_network_name_print":"Print","user_network_name_mail":"Email","user_network_name_flattr":"Flattr","user_network_name_reddit":"Reddit","user_network_name_buffer":"Buffer","user_network_name_love":"Love This","user_network_name_weibo":"Weibo","user_network_name_pocket":"Pocket","user_network_name_xing":"Xing","user_network_name_ok":"Odnoklassniki","user_network_name_mwp":"ManageWP.org","customizer_css":".essb_displayed_mayosisfloatingposition li {rn display: block;rn}rn","mayosisproductbreadcrumb_activate":"true","mayosisproductbreadcrumb_template":"11","mayosisproductbreadcrumb_button_style":"icon","mayosisproductbreadcrumb_counter_pos":"hidden","mayosisproductbreadcrumb_total_counter_pos":"hidden","mayosisproductbreadcrumb_fullwidth_align":"left","mayosisproductbreadcrumb_fullwidth_share_buttons_columns":"1","mayosisproductbreadcrumb_more_button_func":"1","mayosisproductbreadcrumb_share_button_func":"1","mayosisproductbreadcrumb_share_button_counter":"hidden","mayosisproductbreadcrumb_button_size":"xs","mayosisproductbreadcrumb_networks":["facebook","twitter","pinterest","linkedin"],"mayosisproductbottom_activate":"true","mayosisproductbottom_template":"59","mayosisproductbottom_button_style":"icon","mayosisproductbottom_button_size":"xs","mayosisproductbottom_counter_pos":"hidden","mayosisproductbottom_total_counter_pos":"hidden","mayosisproductbottom_fullwidth_align":"left","mayosisproductbottom_fullwidth_share_buttons_columns":"1","mayosisproductbottom_networks":["facebook","twitter","google","linkedin"],"mayosisproductbottom_more_button_func":"1","mayosisproductbottom_share_button_func":"1","mayosisproductbottom_share_button_counter":"hidden","mayosisphoto_activate":"true","mayosisphoto_template":"8","mayosisphoto_button_style":"icon","mayosisphoto_counter_pos":"hidden","mayosisphoto_total_counter_pos":"hidden","mayosisphoto_fullwidth_align":"left","mayosisphoto_fullwidth_share_buttons_columns":"1","mayosisphoto_more_button_func":"1","mayosisphoto_share_button_func":"1","mayosisphoto_share_button_counter":"hidden","mayosisoverlay_activate":"true","mayosisoverlay_template":"36","mayosisoverlay_button_style":"icon","mayosisoverlay_button_pos":"center","mayosisoverlay_button_size":"xs","mayosisoverlay_counter_pos":"hidden","mayosisoverlay_total_counter_pos":"hidden","mayosisoverlay_fullwidth_align":"left","mayosisoverlay_fullwidth_share_buttons_columns":"1","mayosisoverlay_more_button_func":"1","mayosisoverlay_share_button_func":"1","mayosisoverlay_share_button_counter":"hidden"}
32. Other cool EDD extensions
Since the Mayosis theme uses the Easy Digital Downloads plugin, all extensions for this plugin are supported. Do you want to combine FES with commissions for your vendors? Well, that’s possible with the ‘Commissions’ extension. Want to pay vendors instantly when a purchase is made? Well, that is possible too with the ‘Adaptive Payments’ extension! Want to offer software licenses? EDD got you covered with the ‘Software Licensing’ extension. All by combining our beautiful Mayosis theme with a powerful system like Easy Digital Downloads! Take a look at all the extensions EDD offers here: https://easydigitaldownloads.com/downloads/
33. Create Audio Product
Want to create an audio site with Mayosis. Don’t worry. It’s straightforward to use. mayosis Has all options include Wave Player.
Here are the steps to add Audio Product:
Add a Download
Choose Product Format Audio
If you want to use Wave Player, then select template Audio Template. In that case, you have to active Wave Player from settings.
Upload Audio File for demo play
Do the other necessary things like price add, Downloadable file upload, Thumbnail etc.
Now you can customize the player from settings. Here the customize panel tree: Mayosis> Theme Options> Product Options > Audio Options.
Now you can customize the player from settings. Here the customize panel tree: Mayosis> Theme Options> Product Options > Audio Options.
For fixed player choose Wave Type Fixed. There are colour options too.
You will be able to add Audio custom taxonomy like the artist & playlist option from this customizer panel.
34. How to add vendor widget in single product page
Remember that FES is a necessary plugin in order to insert vendor detail widgets from the single product page after it has been installed.
1. Please follow the path Appearance > Widgets
2. Find the widget named ''Mayosis Download Author Widget''
3. Drag and add it to Single Product Sidebar
4. You will find several customization options on it. Its very simple. After setup and saving, you are done.
That's the final output. Thank you.
35. Easy Digital Downloads – Frontend Submissions (FES) configuration
Like previously stated, the Mayosis theme is powered on the Easy Digital Downloads system to provide the awesome digital marketplace. To provide a marketplace where multiple vendors can open up their own digital store and offer their digital products the Mayosis theme provides full support for the Frontend Submissions (FES) extension from Easy Digital Downloads. If you have ever wished to upon up your own multi-vendor marketplace, then this is the golden combination: a beautiful and full of options theme + powerful plugins/extensions from Easy Digital Downloads.
For the vendor dashboard page, choose the ‘full width’ template on the right sde. You get more options here, like changing the background color of the page for example.
2. For the submission fields, the Mayosis theme has created all the custom fields. If you prefer, you can customize the submission fields to your preferences.
3. Same as the submission fields, you can add and edit profile fields too. The Mayosis theme has already set up all the fields for you here, too. That is what we call, convenience!
A few awesome possibilities of the Mayosis heme + FES are:
On the front page we have a section with some featured contributors. These are page builder elements (for both Elementor aswell as WPBakery), which make it easy to customize. In the ‘featured contributor’ element in the page builder you can add user ID’s to display the featured contributor(s).
The awesomeness of the Mayosis theme can be seen on the public vendor profile pages. The pages really focus on the contributors, and give them a spotlight for their awesome digital work. There is a follow system for example, which users can use to follow their favorite vendors. Whenever a vendor uploads a product, the product will be seen in the dashboards of the people who follow the vendor. Vendors can use their own cover photo too, to really make the page their own.
36. How to change dashboard logo?
Maysosis has an extremely well-designed Dashboard. Vendor & normal users both can use the same dashboard with different menus. Now we will see how we can change the dashboard logos.
If you want to change the dashboard logo You have to follow this menu. Mayosis > Theme option > Other Template > Dashboard template
2.Change logo from here. here 2 logos available. one for the Dashboard login logo another one for the inner logo means the main dashboard logo. Upload both logos as you needed.
37. Theme options
The Mayosis theme is packed with cool and handy features which give the users freedom, flexibility
and ease of use. The theme options are available in the WordPress Customizer (accessible via
Appearance > Customizer), and contain the following customization-options:
• Header
• Global Styles
• Global Typography
• Footer
• Product Options
• Product Template
• Other Template
• Other Options
• White label
The options will be explained in this documentation.
38. Email Template
We are added new features on the email section of EDD. Created a new template called mayosis simple email template. Choose that & use below code on the body of purchase email & new sale notification.
Purchase Receipt
<div class="ms-body-top-part">
    <table style="width:560px;padding-bottom:30px;">
        <tbody><tr>
            <td style="text-align:center;">
               Payment ID:<b>{payment_id}</b>
            </td>
        </tr>
    </tbody></table>
    <div class="mayosis-full-description-simple">
        Dear {fullname}, thank you for your purchase. Your product is now ready to download from the link(s) below or from our website at any time (if you registered our site while checkout)
    </div>
    {mayosis_download_list}
</div>
<div class="view-it-box-sample">
    <i>Not displaying correctly?</i>{receipt_link}<br> {invoice} for your future record. If you have any questions regarding your purchase please contact us at [email protected]
</div>
<div class="mayosis-simple-footer ms-padding">
   You are receiving this email because you made a purchase at our site Mayosis. Mayosis is a product of Teconce which allows you to create digital marketplace with WordPress.
</div>
New Sale Notification
<div class="ms-body-top-part">
    <table style="width:560px;padding-bottom:30px;">
        <tbody><tr>
            <td style="text-align:center;">
               Congraculations, {fullname} bought your products!
            </td>
        </tr>
    </tbody></table>
   {mayosis_download_list}
</div>
<div class="view-it-box-sample">
    <i>Not displaying correctly?</i> {receipt_link}<br> You can turn off this email notification from your website settings.
</div>
39. Installing the theme
After installing WordPress, the next step is to install the Mayosis theme. There are two ways to do this:
using FTP and using WordPress.
Using WordPress
1. Log in as admin;
2. Navigate to Appearance > Themes > Install themes;
3. Upload the .ZIP file named mayosis.zip.
If you want to install the child theme too repeat the steps above, but upload the child theme .ZIP file.
Using FTP
1. Extract the .ZIP. This will leave you with a folder named ‘mayosis’;
2. Using your FTP client of choice navigate to /wp-content/themes and upload the folder there.
If you want to install the child theme too repeat the steps above, but upload the child theme folder.
Activating
No matter which method you choose, the theme needs to be activated after install. To activate the
Mayosis theme navigate to Appearance à Themes and choose the blue ‘Activate’ button which
appears under the Mayosis> license.
40. How to enable EDD Category on the menu?
1. Go to the Menu From Appearance > Menu
2. Click on the screen options from the right hand side.
3. It will expand a tray. After expanding, check your necessary items from here. Like we need to check the Downloads category right now.
4. Now you can see the Download category on the left side of the menu.